Thứ Bảy, 28 tháng 9, 2019

HƯỚNG DẪN CẤU HÌNH VRRP

HƯỚNG DẪN CẤU HÌNH VRRP


  1. Khái niệm VRRP.
VRRP là một giao thức chuẩn mở được định nghĩa trong RFC2338. VRRP cung cấp khả năng dự phòng cho các thiết bị mạng.

  1. Mô hình.


[​IMG]

  • Bài Lab thực hiện trên GNS3.

  1. Mục tiêu yêu cầu.

  • Cấu hình đảm bảo một Router có vai trò là Master một Router là Backup, khi Router Master down Router Backup tự động chuyển sang Master.

  1. Hướng dẫn cấu hình.

  1. Cấu hình trên Router Master.
    interface FastEthernet0/0 (Vào cấu hình Interface)
    vrrp 1 ip 192.168.1.1 (Địa chỉ Ip ảo của Router)
    vrrp 1 priority 200 (Cấu hình Priority 200)
    vrrp 1 preempt (Chiếm quyền khi có môt Router khác có priority nhỏ hơn)

  1. Cấu hình trên Router Backup.
    interface FastEthernet0/0 (Vào cấu hình Interface)
    vrrp 1 ip 192.168.1.1 (Địa chỉ Ip ảo của Router)
    vrrp 1 priority 100 (Cấu hình Priority 100)
    vrrp 1 preempt (Chiếm quyền khi có môt Router khác có priority nhỏ hơn)

  1. Kiểm tra.

  • Thực hiện kiểm tra trên Router Master.
    Master#show vrrp brief
Interface Grp Pri Time Own Pre State Master addr Group addr
Fa0/0 1 200 3218 Y Master 192.168.1.2 192.168.1.1

  • Thực hiện kiểm tra trên Router Backup.
    Backup#show vrrp brief
Interface Grp Pri Time Own Pre State Master addr Group addr
Fa0/0 1 100 3609 Y Backup 192.168.1.2 192.168.1.1

  • Thực hiện Down Interface fa0/0 Router Master sau đó kiểm tra trên Router Backup.
Backup#show vrrp brief
Interface Grp Pri Time Own Pre State Master addr Group addr
Fa0/0 1 100 3609 Y Master 192.168.1.3 192.168.1.1

Đã tử động chuyển sang Master.

  • Thực hiện Enable Interface fa0/0 trên Router Master và kiểm tra trên hai router

    Master#show vrrp brief
Interface Grp Pri Time Own Pre State Master addr Group addr
Fa0/0 1 200 3218 Y Master 192.168.1.2 192.168.1.1
Backup#show vrrp brief
Interface Grp Pri Time Own Pre State Master addr Group addr
Fa0/0 1 100 3609 Y Backup 192.168.1.2 192.168.1.1
The end

Thứ Năm, 26 tháng 9, 2019

Cách map network drive bằng Command Prompt trên Windows

Cách map network drive bằng Command Prompt trên Windows

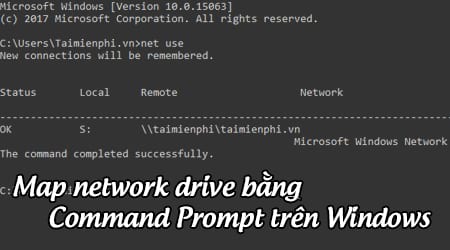
Cách map network drive bằng Command Prompt trên Windows là cách nhanh nhất để bạn đọc có thể chia sẻ dữ liệu thông qua mạng LAN thay vì chúng ta phải thao tác thủ công dưới dạng một drive mới bên dưới This PC ở thư mục File Explorer.
Việc chia sẻ dữ liệu qua mạng Lan trên Windows vô cùng đơn giản, đặc biệt là khi bạn có thể Map network drive để tạo một shorcut đến một phân vùng hay một folder được chia sẻ qua mạng bằng cách mapping khu vực đó. Sau khi map một đường dẫn tới network drive, nó sẽ xuất hiện hiện dưới dạng một drive mới bên dưới This PC ở thư mục File Explorer. Từ đây, người dùng có thể dễ dàng truy cập vào các tệp tin và thư mục đã được chia sẻ, giống như trong mạng local vậy.
cach map network drive bang command prompt tren windows
Tuy nhiên bạn lại hoàn toàn có thể thực hiện việc map network drive nhanh chóng bằng cách map network drive thông qua cửa sổ Command Prompt trên Windows. Và bài viết sau đây là tất cả cách thức thực hiện để bạn có thể map network drive bằng Command Prompt.
CÁCH MAP NETWORK DRIVE BẰNG COMMAND PROMPT TRÊN WINDOWS
Để map network drive bằng Command Prompt trên Windows, chúng ta sẽ sử dụng lệnh net use trong Command Prompt. Bạn cũng có thể sử dụng lệnh tương tự trong PowerShell nếu bạn thích. Khi đó trên cửa sổ Command Prompt, các bạn nhập lệnh net use DRIVE: PATH sau đó nhấn Enter. Trong đó DRIVE là ký tự ổ đĩa bạn muốn sử dụng và PATH là đường dẫn đầy đủ UNC để chia sẻ.
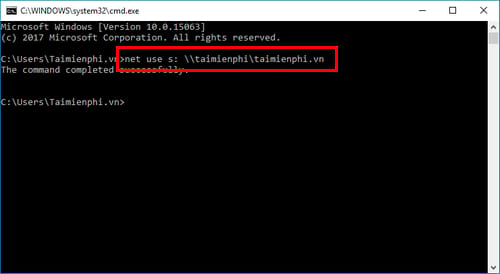
Ví dụ: nếu chúng ta muốn map network drive thư mục taimienphi.vn với định danh đường dẫn tới thư mục đó là ký tự ổ đĩa S thì chúng ta sẽ sử dụng lệnh sau:
net use s: \\taimienphi\taimienphi.vn
cach map network drive bang command prompt tren windows 2
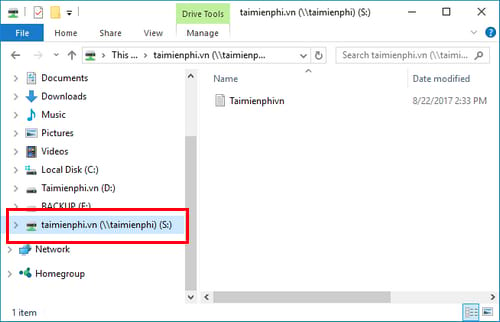
Ngay lập tức khi bạn mở This PC hay File Explorer sẽ thấy xuất hiện ngay ổ đĩa S vừa được chúng ta map network drive này.
cach map network drive bang command prompt tren windows 3
Nếu chia sẻ mà bạn đang kết nối được bảo vệ với một số loại xác thực, thì thay vì phải gõ tên người dùng và mật khẩu mỗi khi bạn mở ổ đĩa mạng đó, bạn có thể thêm tên người dùng và mật khẩu với lệnh /user:
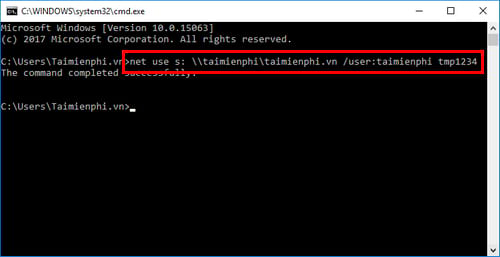
Ví dụ: nếu chúng tôi chia sẻ thư mục taimienphi.vn với tên người dùng là Taimienphi và mật khẩu là tmp1234, chúng tôi sẽ sử dụng lệnh:
net use s: \\taimienphi\taimienphi.vn /user:Taimienphi tmp1234
cach map network drive bang command prompt tren windows 4
Theo mặc định, các ổ đĩa được map network drive bằng Command Prompt không được duy trì và sẽ biến mất mỗi khi bạn khởi động lại máy tính. Vì vậy, nếu bạn muốn những ổ đĩa được map network không bị mất, bạn có thể sử dụng thêm lệnh /persistent. Khi đó với tư cách là một câu lệnh chuyển đổi chúng ta sẽ có như sau:
/persistent:Yes: làm cho các kết nối mà bạn tạo được kết nối lâu dài. Các kết nối trong tương lai mà bạn thực hiện bằng lệnh, trong cùng một phiên cũng liên tục (ngay cả khi bạn không sử dụng lệnh /persistent: Yes) cho đến khi bạn sử dụng /persistent:No để tắt.
/persistent:No: tắt tính năng kết nối lâu dài. Các kết nối sau bạn thực hiện không còn liên tục cho đến khi bạn kích hoạt lại.
Vì vậy, về cơ bản bạn có thể gõ lệnh tương tự như lệnh sau rồi nhấn Enter.
net use s: <\\taimienphi\taimienphi.vn> /user:taimienphi tmp1234 /persistent:Yes
cach map network drive bang command prompt tren windows 5
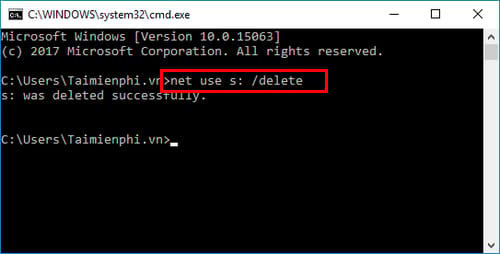
Nếu bạn cần xóa một ổ đĩa mạng đã được map network, tất cả những gì bạn phải làm là chỉ định ký tự ổ đĩa mà bạn muốn xóa và thêm lệnh /delete.
cach map network drive bang command prompt tren windows 6
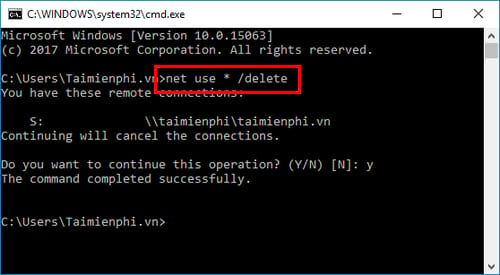
Bạn cũng có thể sử dụng dấu hoa thị (*) như một ký tự đại diện nếu bạn muốn xóa tất cả các ổ đĩa được map network trên máy tính trong một lần
net use * /delete
cach map network drive bang command prompt tren windows 7
https://thuthuat.taimienphi.vn/cach-map-network-drive-bang-command-prompt-tren-windows-26167n.aspx 
Một khi bạn đã quen với việc sử dụng câu lệnh để map network drive bằng Command Prompt trên Windows này, bạn sẽ thấy nó nhanh hơn rất nhiều so với cách sử dụng qua File Explorer nhất là khi bạn thường xuyên phải thực hiện map network drive. Khá thú vị với cửa sổ Command Prompt được tích hợp trên Windows khi công dụng của nó khá là tiện lợi. Bằng cách sử dụng cửa sổ Command Prompt, bạn đọc còn có thể kiểm tra tình trạng ổ cứng khi mà yếu tố hoạt động nhanh hay chậm phụ thuộc khá nhiều vào ổ đĩa này. Bằng bài viết hướng dẫn cách kiểm tra ổ cứng bằng Command Prompt trước đó, bạn đọc sẽ dễ dàng có thể biết được tình trạng ổ cứng máy tính của mình như thế nào để có phương hướng sử dụng đúng cách. Chúc các bạn thành công.

Thứ Hai, 23 tháng 9, 2019

Tổng hợp các lệnh Run CMD thông dụng

CMD - Command Prompt là một ứng dụng dùng để thực thi các lệnh có sẵn trong Windows. CMD trong Windows cung cấp rất nhiều lệnh, những lệnh này sử dụng để làm công việc điều hành hệ thống từ một giao diện nhập lệnh thay vì thao tác trực tiếp trên giao diện Windows. Dưới đây là một số lệnh CMD thông dụng trong số rất nhiều lệnh mà Windows cung cấp.

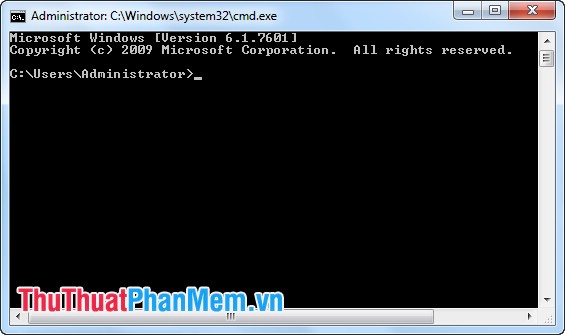
Để mở cửa sổ CMD, các bạn có thể mở hộp thoại Run (Windows + R) trong Start. Trong hộp thoại Run gõ cmd -> OK (hoặc Enter).
CMD

1. Lệnh PING.

Cú pháp: ping ip/host/[/t][/a][/l][/n]
Ip: địa chỉ IP của máy cần kiểm tra; host là tên của máy tính cần kiểm tra kết nối mạng (có thể sử dụng địa chỉ IP hoặc tên của máy tính).
/t: sử dụng để máy tính liên tục "ping" đến máy tính đích, bấm Ctrl +C để dừng.
/a: nhận địa chỉ IP từ tên máy tính (host).
/l: xác định độ rộng của gói tin gửi đi kiểm tra.
/n: Xác định số gói tin gửi đi.
Công dụng của lệnh PING: Sử dụng lện Ping để kiểm tra xem một máy tính có kết nối mạng không. Lệnh PING gửi các gói tin từ máy tính bạn tới máy tính đích, các bạn có thể xác định được tình trạng đường truyền hoặc xác định máy tính đó có kết nối hay không.

2. Lệnh Tracert.

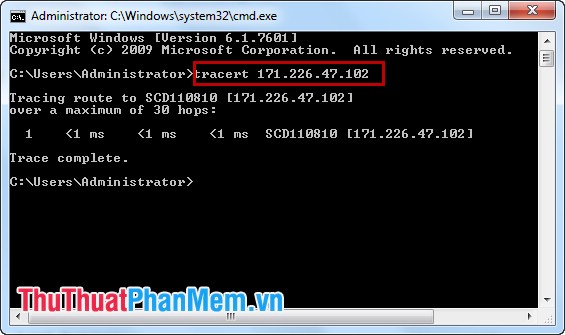
Cú pháp: tracert ip/host
ip/host: Địa chỉ ip/ tên máy tính.
Lệnh Tracert
Công dụng lệnh Tracert: Lệnh giúp bạn thấy đường đi của các gói tin từ máy tính các bạn đến máy tính đích, xem các gói tin đi qua những server hay router nào…

3. Lệnh Netstat.

Cú pháp: Netstat [/a][/e][/n]
/a: Hiển thị tất cả kết nối và các cổng đang lắng nghe.
- /e: Thông tin thống kê Ethernet.
/n: Hiển thị các địa chỉ và các số cổng kết nối.
Các bạn có thể tham khảo thêm các tham số khác bằng cách gõ Netstat/?
Công dụng của lệnh Netstat: Liệt kê các kết nối ra vào máy tính của các bạn.

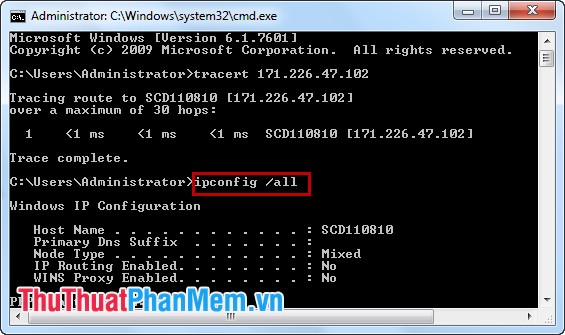
4. Lệnh Ipconfig.

ADVERTISEMENT
Cú pháp: ipconfig /all
Lệnh ipconfig
Công dụng: Hiển thị cấu hình IP của máy tính các bạn đang sử dụng (tên host, địa chỉ IP, DNS…).

5. Lệnh Shutdown.

Cú pháp (Windows 7):
- Tắt máy: Shutdown -s -t [a]
- Khởi động máy: Shutdown -r -t [a]
a: thời gian tắt máy (đơn vị giây).
Công dụng: Tắt và khởi động lại máy tính.

6. Lệnh DIR.

Cú pháp: DIR [drive:] [path][filename]
Path: Đường dẫn tới file, folder.
Filename: Tên file.
Công dụng của lện DIR: Xem file, folder.

7. Lệnh DEL.

Cú pháp: DEL [/p][/f][/s][/q][/a[[:]attributes]] "tên file cần xóa"
/p: Hiển thị thông tin file trước khi xóa.
/f: Xóa các file có thuộc tính chỉ đọc (read-only).
- /s: Xóa file đó trong tất cả các thư mục có chứa.
/q: Xóa không cần hỏi.
/a[[:]attributes]: Xóa theo thuộc tính của file (R: Read-only files, S: System files, H: Hidden files).
Xóa tất cả file *.*
Công dụng: Xóa file.

8. Lệnh COPY.

Cú pháp: COPY "địa chỉ cần copy" "địa chỉ lưu file copy" /y
/y: Copy không cần hỏi.
Công dụng: Copy file từ thư mục này sang thư mục khác trong máy tính.

9. Lệnh RD.

Cú pháp: RD /s /q "thư mục cần xóa"
/s: Xóa toàn bộ thư mục.
- /q: Xóa không cần hỏi.
Công dụng: Lệnh RD giúp các bạn xóa thư mục.

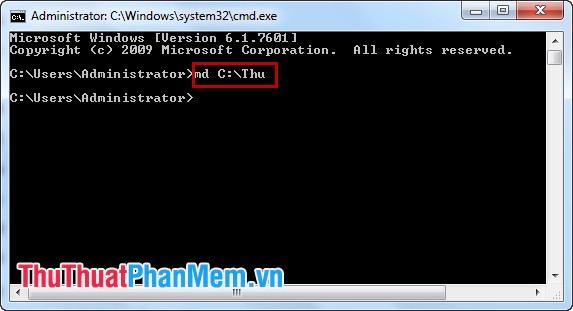
10. Lệnh MD.

Cú pháp: MD "đường dẫn lưu file cần tạo"\"tên thư mục cần tạo"
Ví dụ: md "C:\Thu" (tạo thư mục Thu trong ổ đĩa C).
Công dụng: Tạo thư mục mới.
Lệnh MD

11. Lệnh TASKKILL.

Cú pháp: taskkill /f /im "tên ứng dụng".exe.
Ví dụ taskkill /f /im Skype.exe (tắt ứng dụng Skype).
Công dụng: Tắt một ứng dụng đang chạy.

12. Lệnh REG ADD.

Cú pháp: REG ADD KeyName [/v ValueName] [/t Type] [/s Separator] [/d Data] [/f]
KeyName: Đường dẫn tới Key.
/v ValueName: Tên value cần tạo.
/t Type: Kiểu dữ liệu.
/d Data: Giá trị value.
Công dụng: Tạo, chỉnh sửa Registry.

13. Lệnh REG DELETE.

Cú pháp: REG DELETE KeyName [/v ValueName] [/f]
- [/v ValueName]: Tên value cần xóa.
Công dụng: Xóa value trong Registry.

14. Lệnh REGEDIT.EXT.

Cú pháp: Regedit.exe /s "nơi chưa file .reg"
/s: Không cần hỏi.
Công dụng: Chạy file .reg.

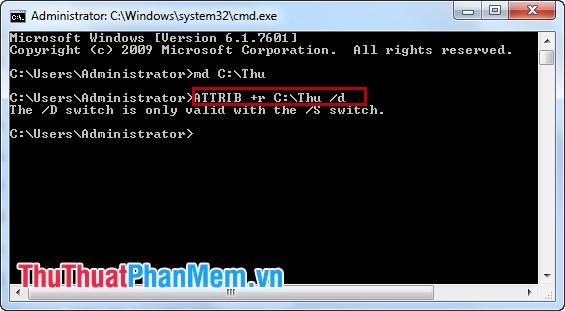
15. Lệnh ATTRIB.

Cú pháp: ATTRIB -a -s -h -r "file, thư mục" /s /d
hoặc ATTRIB +a +s +h +r "file, thư mục" /s /d
Dấu +: Thêm vào thuộc tính.
Dấu -: Loại bỏ thuộc tính.
a: Archive (thuộc tính lưu trữ).
s: System (thuộc tính hệ thống).
h: Hidden (thuộc tính ẩn).
r: Read- only (thuộc tính chỉ đọc).
/s: Thực hiện với tất cả các file nằm trong thư mục và các thư mục con.
/d: Đặt thuộc tính cho thư mục và thư mục con.
Lệnh Attrib
Công dụng: Đặt thuộc tính cho file, folder.
Trên đây là một số lệnh CMD hữu ích và thông dụng nhất. Ngoài ra còn có các câu lệnh CMD khác ít được sử dụng hơn nhưng có lúc cũng cần thiết các bạn có thể tìm hiểu thêm.

Thứ Bảy, 21 tháng 9, 2019

How To Change The Trusted Installer In Windows Server 2012

How To Change The Trusted Installer In Windows Server 2012

Sathish Nadarajan
Solution Architect
December 11, 2013
Rate this article
Views
36489
Most of the times, being a SharePoint Developer, we will be modifying, deleting, renaming the system files for some reason. Even on the previous article, we saw that, we need to modify the config file of the powershell, which is placed under System32 folder. These folders, though you logged in as administrator, cannot modify the files. They only trust the TrustedInstaller Account. Thus, even before the Administrator Account got created, these folders and files would have been created. Hence, there is no other option other than, changing the Owner to some other account from the TrustedOwner. Before proceeding that, let us try to understand who is TrustedInstaller Account and What it can do.
TrustedInstaller is a built-in user account in Windows 8Windows 7, and Windows Vista. This user account “owns” a variety of system files, including some files in your Program Files folder, your Windows folder, and even the Windows.old folder that is created after you upgrade from one version of Windows to another. To rename or delete these files, you’ll have to take ownership of them away from the TrustedInstaller user account.
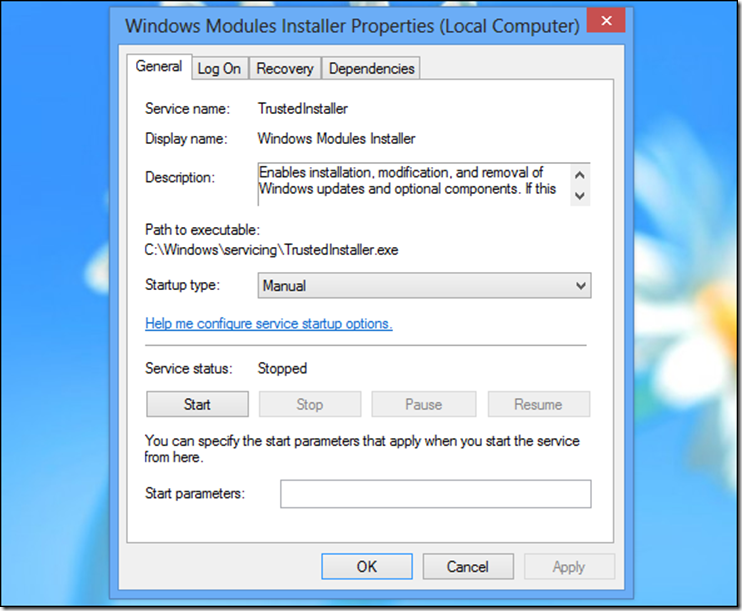
The TrustedInstaller user account is used by the Windows Modules Installer service included with Windows. This service is responsible for installing, modifying, and removing Windows updates and other optional Windows components, so it has the exclusive ability to modify them.
clip_image002
With this basic information, let us see how to modify the Owner of System32 folder.
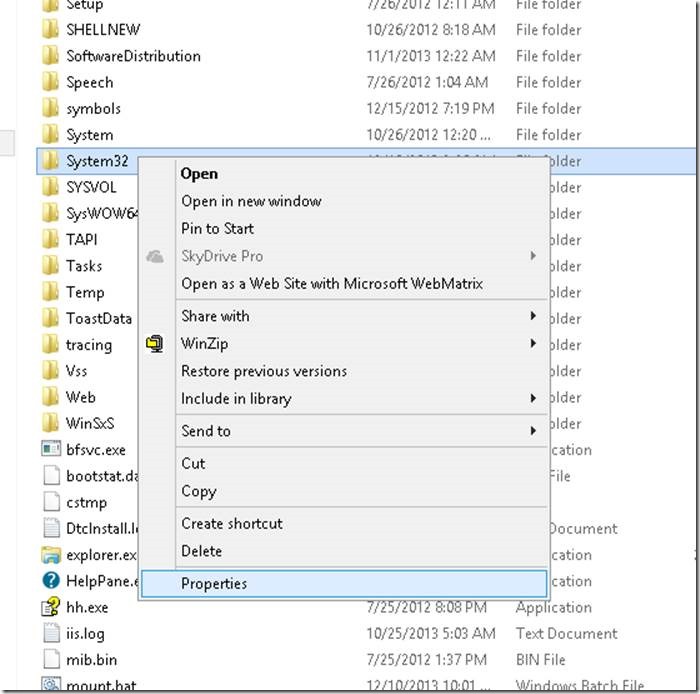
1. Go to the System32 folder. Right click.
clip_image004
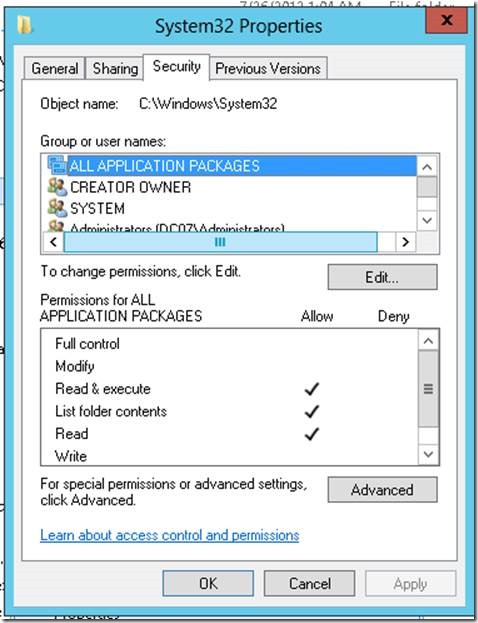
2. Select Properties. The properties window will be as follows.
clip_image006
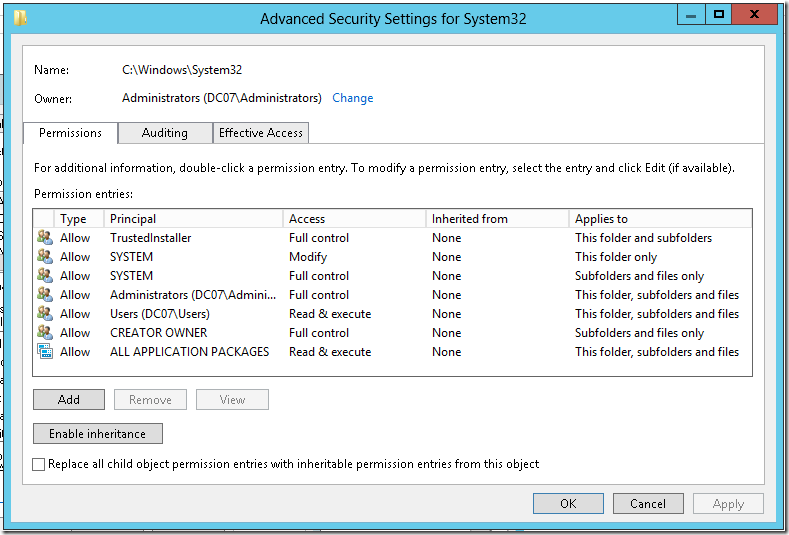
3. On the Security Tab, select the Advanced Button.
clip_image007
4. On the Owner: Click the Change hyperlink and modify the user from “TrustedInstaller” to some other user as I did.
5. Now, if we want to modify anything on the System32 folder, we can very well go ahead and modify them.
Happy Coding.
Sathish Nadarajan.
Category : SharePointWindows

Author Info

Sathish Nadarajan
Solution Architect
Rate this article

CHANGING WORK FOLDERS CONFIGURATION

CHANGING WORK FOLDERS CONFIGURATION


On the Server Manager Service Primary Tile locate the SERVICES tile.  Locate the SyncShareSvc.  Verify it is stopped.  If it is not stopped, select the SyncShareSvc and stop it.

Navigate to the directory on the server where work folders feature is enabled.

>cd c:\windows\system32

Edit the file with your favorite editor (file name = SyncShareSvc.config)

Locate the section below and make the changes to your port designation


For this
example you want to change SSL Port from 443 to 12345.  Change the port number and close the file.   Because the sync service does not run under the system designation it does not have the privileges to access different ports other than the default. It runs under LOCAL SERVICE.  Because of this designation the administrator has to run another command.   In an elevated command window type the following command:

Netsh http add urlacl url=https://*:12345/ user="NT Authority\LOCAL SERVICE"


Navigate to SERVICES tile in Server Manager and start the service SyncShareSvc.

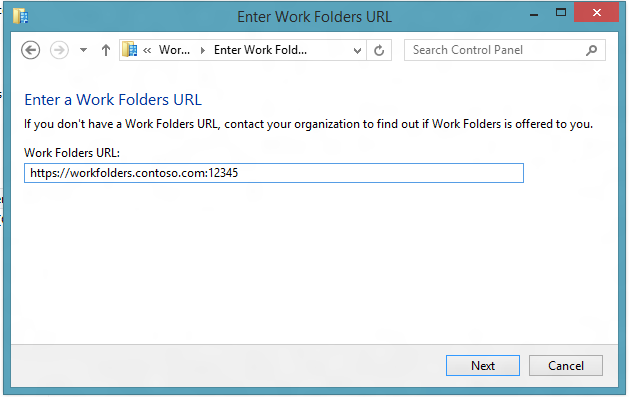
Since the Work Folders configuration on the client defaults to either HTTPS=443 or HTTP=80 there is additional configuration to override the default ports.  The administrator will need to change the URL for connecting to the Windows Server hosting the clients sync share.  Normally all that would be necessary is the URL of the server.  Since the port has changed there is an additional parameter in the URL which is – colon port number “:#”.  This  number matches the configuration in the configuration file on the server SyncShareSvc.config.   See example of the PC client configuration below:


NOTE: When the administrator changes the default ports for Work Folders they cannot use the auto discovery process.  They can communicate the new URL using Group Policy or a standard email communication with the URL and new port definition.

https://techcommunity.microsoft.com/t5/Storage-at-Microsoft/Windows-Server-2012-R2-8211-Resolving-Port-Conflict-with-IIS/ba-p/424985

HTTP Redirects on windows server 2012

HTTP Redirects <httpRedirect>

The <httpRedirect> element configures settings for Internet Information Services (IIS) 7 that redirect client requests to a new location.
There are several reasons why you might want to redirect clients to a new location. For example, if your company is migrating to a new Web site, you could redirect all requests from the old Web site to the new Web site. Likewise, if you have deployed a new application on a Web server, you could redirect all requests for the old application's URL namespace (for example, http://www.contoso.com/app_v1.0/) to the new applications location (for example, http://www.contoso.com/app_v2.0/).
In the simplest configuration, you need only set the enabled and destination attributes of the <httpRedirect> element in order to redirect clients to a new location. However, additional elements like the exactDestination and httpResponseStatus attributes allow you to configure the end-user experience of the redirection by respectively specifying whether IIS 7 will return the destination URL exactly as entered and which HTTP response code to return to the Web client.

Compatibility

VersionNotes
IIS 10.0An additional HTTP response status was added to the <httpRedirect> element in IIS 10.0.
IIS 8.5The <httpRedirect> element was not modified in IIS 8.5.
IIS 8.0The <httpRedirect> element was not modified in IIS 8.0.
IIS 7.5The <httpRedirect> element was not modified in IIS 7.5.
IIS 7.0The <httpRedirect> element was introduced in IIS 7.0.
IIS 6.0The <httpRedirect> element replaces the IIS 6.0 HttpRedirect metabase property.

Setup

HTTP Redirection is not available on the default installation of IIS 7 and later. To install it, use the following steps.

Windows Server 2012 or Windows Server 2012 R2

  1. On the taskbar, click Server Manager.
  2. In Server Manager, click the Manage menu, and then click Add Roles and Features.
  3. In the Add Roles and Features wizard, click Next. Select the installation type and click Next. Select the destination server and click Next.
  4. On the Server Roles page, expand Web Server (IIS), expand Web Server, expand Common HTTP Features, and then select HTTP Redirection. Click Next.
     .
  5. On the Select features page, click Next.
  6. On the Confirm installation selections page, click Install.
  7. On the Results page, click Close.

Windows 8 or Windows 8.1

  1. On the Start screen, move the pointer all the way to the lower left corner, right-click the Start button, and then click Control Panel.
  2. In Control Panel, click Programs and Features, and then click Turn Windows features on or off.
  3. Expand Internet Information Services, expand World Wide Web Services, expand Common HTTP Features, and then select HTTP Redirection.
  4. Click OK.
  5. Click Close.

Windows Server 2008 or Windows Server 2008 R2

  1. On the taskbar, click Start, point to Administrative Tools, and then click Server Manager.
  2. In the Server Manager hierarchy pane, expand Roles, and then click Web Server (IIS).
  3. In the Web Server (IIS) pane, scroll to the Role Services section, and then click Add Role Services.
  4. On the Select Role Services page of the Add Role Services Wizard, expand Common Http Features, select HTTP Redirection, and then click Next.
  5. On the Confirm Installation Selections page, click Install.
  6. On the Results page, click Close.

Windows Vista or Windows 7

  1. On the taskbar, click Start, and then click Control Panel.
  2. In Control Panel, click Programs and Features, and then click Turn Windows Features on or off.
  3. Expand Internet Information Services, then World Wide Web Services, then Common Http Features.
  4. Select HTTP Redirection, and then click OK.

How To

There is no user interface for adding wildcard HTTP redirects for IIS 7. For examples of how to add <add> elements to the <httpRedirect> element programmatically, see the Code Samplessection of this document.

How to add an HTTP redirect rule to a Web site or application

  1. Open Internet Information Services (IIS) Manager:
    • If you are using Windows Server 2012 or Windows Server 2012 R2:
      • On the taskbar, click Server Manager, click Tools, and then click Internet Information Services (IIS) Manager.
    • If you are using Windows 8 or Windows 8.1:
      • Hold down the Windows key, press the letter X, and then click Control Panel.
      • Click Administrative Tools, and then double-click Internet Information Services (IIS) Manager.
    • If you are using Windows Server 2008 or Windows Server 2008 R2:
      • On the taskbar, click Start, point to Administrative Tools, and then click Internet Information Services (IIS) Manager.
    • If you are using Windows Vista or Windows 7:
      • On the taskbar, click Start, and then click Control Panel.
      • Double-click Administrative Tools, and then double-click Internet Information Services (IIS) Manager.
  2. In the Connections pane, expand the server name, expand Sites, and then navigate to the Web site or application that you want to configure custom error pages for.
  3. In the Home pane, double-click HTTP Redirect.
  4. In the HTTP Redirect pane, check the box to redirect requests and enter the destination URL.
  5. You can optionally specify any of the following options:
    • Configure the redirection destination to be the exact destination as entered.
    • Configure the redirection destination to be limited to the destination URL's root folder, not subfolders.
    • Configure the HTTP status code, which can be one of these three options:
      • 301 Permanent
      • 302 Found
      • 307 Temporary
      • 308 Permanent Redirect
       Note
      IIS 7 will respectively return the following actual HTTP response statuses for each of the above options:
      • HTTP/1.1 301 Moved Permanently
      • HTTP/1.1 302 Redirect
      • HTTP/1.1 307 Redirect
      • HTTP 1.1 308 Redirected Permanently
  6. When you have finished all the above changes, click Apply in the Tasks pane.

Configuration

Attributes

AttributeDescription
childOnlyOptional Boolean attribute. 

Specifies whether the destination value should be added to the beginning of the file name that contains the request to be redirected. For example, if childOnly were set to true and the destination value were configured to be http://marketing.contoso.com/, a request for http://contoso.com/default.htmwould be redirected to http://marketing.contoso.com/default.htm

The default value is false.
destinationOptional string attribute. 

Specifies a URL or virtual path to which to redirect the client.
enabledOptional Boolean attribute. 

Specifies whether redirection is enabled (true) or disabled (false). 

The default value is false.
exactDestinationOptional Boolean attribute. 

Specifies that the destination value should be considered an absolute target location, not a relative location. 

The default value is false.
httpResponseStatusOptional enum attribute. 

Specifies type of redirection. 

The httpResponseStatus attribute can be one of the following possible values. The default is Found.
ValueDescription
FoundReturns a 302 status code, which tells the client to issue a new request to the location specified in the destination attribute. 

The numeric value is 302.
PermanentReturns a 301 status code, which informs the client that the location for the requested resource has permanently changed. 

The numeric value is 301.
TemporaryReturns a 307 status code, which prevents the client from losing data when the browser issues an HTTP POST request. 

The numeric value is 307.
PermRedirectReturns a 308 status code, which informs the client that the location for the requested resource has permanently changed. 

The numeric value is 308.

Child Elements

ElementDescription
addOptional element. 

Adds a wildcard redirection rule to the collection of redirection rules.
clearOptional element. 

Removes all references to wildcard redirection rules from the collection of redirection rules.
removeOptional element. 

Removes a reference to a wildcard redirection rule from the collection of redirection rules.

Configuration Sample

The following default <httpRedirect> element is configured in the root ApplicationHost.config file in IIS 7 when the HTTP Redirection role service is installed. This configuration section inherits the default configuration settings unless you use the <clear> element.
XML
<system.webServer>
   <httpRedirect enabled="false" />
</system.webServer>
The following configuration sample enables redirection and configures the destination URL to which clients are redirected.
XML
<system.webServer>
   <httpRedirect enabled="true" destination="http://www.contoso.com/" />
</system.webServer>
The following configuration sample adds a wildcard redirection entry that redirects all requests for PHP files to the home page of your Web site.
 Note
This example is useful if you have removed all ASP-based applications from your Web site and you wanted client requests for the old applications to be redirected to the root of your Web site rather than receiving an HTTP 404 Not Found response.
XML
<configuration>
   <system.webServer>
      <httpRedirect enabled="true" exactDestination="true" httpResponseStatus="Found">
         <add wildcard="*.php" destination="/default.htm" />
      </httpRedirect>
   </system.webServer>
</configuration>

Sample Code

The following code samples configure the Default Web Site to redirect all requests to http://www.contoso.com using an HTTP 302 status code.

AppCmd.exe

console
appcmd.exe set config "Default Web Site" -section:system.webServer/httpRedirect /enabled:"True"
appcmd.exe set config "Default Web Site" -section:system.webServer/httpRedirect /destination:"http://www.contoso.com"
appcmd.exe set config "Default Web Site" -section:system.webServer/httpRedirect /exactDestination:"False"
appcmd.exe set config "Default Web Site" -section:system.webServer/httpRedirect /httpResponseStatus:"Found"

C#

C#
using System;
using System.Text;
using Microsoft.Web.Administration;

internal static class Sample
{
   private static void Main()
   {
      using (ServerManager serverManager = new ServerManager())
      {
         Configuration config = serverManager.GetWebConfiguration("Default Web Site");

         ConfigurationSection httpRedirectSection = config.GetSection("system.webServer/httpRedirect");
         httpRedirectSection["enabled"] = true;
         httpRedirectSection["destination"] = @"http://www.contoso.com";
         httpRedirectSection["exactDestination"] = false;
         httpRedirectSection["httpResponseStatus"] = @"Found";

         serverManager.CommitChanges();
      }
   }
}

VB.NET

VB
Imports System
Imports System.Text
Imports Microsoft.Web.Administration

Module Sample

   Sub Main()
      Dim serverManager As ServerManager = New ServerManager
      Dim config As Configuration = serverManager.GetWebConfiguration("Default Web Site")

      Dim httpRedirectSection As ConfigurationSection = config.GetSection("system.webServer/httpRedirect")
      httpRedirectSection("enabled") = True
      httpRedirectSection("destination") = "http://www.contoso.com"
      httpRedirectSection("exactDestination") = False
      httpRedirectSection("httpResponseStatus") = "Found"

      serverManager.CommitChanges()
   End Sub

End Module

JavaScript

JavaScript
var adminManager = new ActiveXObject('Microsoft.ApplicationHost.WritableAdminManager');
adminManager.CommitPath = "MACHINE/WEBROOT/APPHOST/Default Web Site";

var httpRedirectSection = adminManager.GetAdminSection("system.webServer/httpRedirect", "MACHINE/WEBROOT/APPHOST/Default Web Site");
httpRedirectSection.Properties.Item("enabled").Value = true;
httpRedirectSection.Properties.Item("destination").Value = "http://www.contoso.com";
httpRedirectSection.Properties.Item("exactDestination").Value = false;
httpRedirectSection.Properties.Item("httpResponseStatus").Value = "Found";

adminManager.CommitChanges();

VBScript

VB
Set adminManager = WScript.CreateObject("Microsoft.ApplicationHost.WritableAdminManager")
adminManager.CommitPath = "MACHINE/WEBROOT/APPHOST/Default Web Site"

Set httpRedirectSection = adminManager.GetAdminSection("system.webServer/httpRedirect", "MACHINE/WEBROOT/APPHOST/Default Web Site")
httpRedirectSection.Properties.Item("enabled").Value = True
httpRedirectSection.Properties.Item("destination").Value = "http://www.contoso.com"
httpRedirectSection.Properties.Item("exactDestination").Value = False
httpRedirectSection.Properties.Item("httpResponseStatus").Value = "Found"

adminManager.CommitChanges()
The following code samples adds a wildcard redirection entry that redirects all requests for ASP files to the home page of your Web site.
 Note
This example is useful if you have removed all ASP-based applications from your Web site and you wanted client requests for the old applications to be redirected to the root of your Web site rather than receiving an HTTP 404 Not Found response.

AppCmd.exe

console
appcmd.exe set config "Default Web Site" -section:system.webServer/httpRedirect /enabled:"True" /exactDestination:"True" /httpResponseStatus:"Found"

appcmd.exe set config "Default Web Site" -section:system.webServer/httpRedirect /+"[wildcard='*.asp',destination='/default.htm']"

C#

C#
using System;
using System.Text;
using Microsoft.Web.Administration;

internal static class Sample
{
   private static void Main()
   {
      using(ServerManager serverManager = new ServerManager()) { 
         Configuration config = serverManager.GetWebConfiguration("Default Web Site");

         ConfigurationSection httpRedirectSection = config.GetSection("system.webServer/httpRedirect");
         httpRedirectSection["enabled"] = true;
         httpRedirectSection["exactDestination"] = true;
         httpRedirectSection["httpResponseStatus"] = @"Found";

         ConfigurationElementCollection httpRedirectCollection = httpRedirectSection.GetCollection();
         ConfigurationElement addElement = httpRedirectCollection.CreateElement("add");
         addElement["wildcard"] = @"*.asp";
         addElement["destination"] = @"/default.htm";
         httpRedirectCollection.Add(addElement);

         serverManager.CommitChanges();
      }
   }
}

VB.NET

VB
Imports System
Imports System.Text
Imports Microsoft.Web.Administration

Module Sample

   Sub Main()
      Dim serverManager As ServerManager = New ServerManager
      Dim config As Configuration = serverManager.GetWebConfiguration("Default Web Site")

      Dim httpRedirectSection As ConfigurationSection = config.GetSection("system.webServer/httpRedirect")
      httpRedirectSection("enabled") = True
      httpRedirectSection("exactDestination") = True
      httpRedirectSection("httpResponseStatus") = "Found"

      Dim httpRedirectCollection As ConfigurationElementCollection = httpRedirectSection.GetCollection
      Dim addElement As ConfigurationElement = httpRedirectCollection.CreateElement("add")
      addElement("wildcard") = "*.asp"
      addElement("destination") = "/default.htm"
      httpRedirectCollection.Add(addElement)

      serverManager.CommitChanges()
   End Sub

End Module

JavaScript

JavaScript
var adminManager = new ActiveXObject('Microsoft.ApplicationHost.WritableAdminManager');
adminManager.CommitPath = "MACHINE/WEBROOT/APPHOST/Default Web Site";

var httpRedirectSection = adminManager.GetAdminSection("system.webServer/httpRedirect", "MACHINE/WEBROOT/APPHOST/Default Web Site");
httpRedirectSection.Properties.Item("enabled").Value = true;
httpRedirectSection.Properties.Item("exactDestination").Value = true;
httpRedirectSection.Properties.Item("httpResponseStatus").Value = "Found";

var httpRedirectCollection = httpRedirectSection.Collection;
var addElement = httpRedirectCollection.CreateNewElement("add");
addElement.Properties.Item("wildcard").Value = "*.asp";
addElement.Properties.Item("destination").Value = "/default.htm";
httpRedirectCollection.AddElement(addElement);

adminManager.CommitChanges();

VBScript

VB
Set adminManager = WScript.CreateObject("Microsoft.ApplicationHost.WritableAdminManager")
adminManager.CommitPath = "MACHINE/WEBROOT/APPHOST/Default Web Site"

Set httpRedirectSection = adminManager.GetAdminSection("system.webServer/httpRedirect", "MACHINE/WEBROOT/APPHOST/Default Web Site")
httpRedirectSection.Properties.Item("enabled").Value = True
httpRedirectSection.Properties.Item("exactDestination").Value = True
httpRedirectSection.Properties.Item("httpResponseStatus").Value = "Found"

Set httpRedirectCollection = httpRedirectSection.Collection
Set addElement = httpRedirectCollection.CreateNewElement("add")
addElement.Properties.Item("wildcard").Value = "*.asp"
addElement.Properties.Item("destination").Value = "/default.htm"
httpRedirectCollection.AddElement(addElement)

adminManager.CommitChanges()