Ubuntu 22.04 System Backup and Restore
The purpose of this tutorial is to show how to install Timeshift on Ubuntu 22.04 Jammy Jellyfish and use the program to perform a backup of the system, and subsequently restore the system from that backup.
Most Linux users love to customize their Linux system
to their liking. If your system becomes unusable, all of this work put
into customizing your system will be lost, because you have to reinstall
Ubuntu and start over.
Timeshift is an application that will backup your system settings and files. It does NOT backup personal files. Taking a snapshot with Timeshift will allow you to browse that snapshot any time, like you would a normal directory of files. If your system gets corrupted or goes through some undesirable change, it is easy to restore your system as it was by using Timeshift.
Let’s see how to install Timeshift on Ubuntu 22.04 Jammy Jellyfish and make a backup of our system files.
In this tutorial you will learn:
- How to install Timeshift on Ubuntu 22.04
- How to use Timeshift to create a backup snapshot
- How to restore a Timeshift snapshot backup
- How to use Timeshift from the command line

| Category | Requirements, Conventions or Software Version Used |
|---|---|
| System | Ubuntu 22.04 Jammy Jellyfish |
| Software | Timeshift |
| Other | Privileged access to your Linux system as root or via the sudo command. |
| Conventions |
# – requires given linux commands to be executed with root privileges either directly as a root user or by use of sudo command$ – requires given linux commands to be executed as a regular non-privileged user |
Ubuntu 22.04 System Backup and Restore step by step instructions
Using the following steps we will first create system backup of the Ubuntu 22.04 system using the Timeshift graphical user interface. Later we will restore from the previously created system backup snapshot. Let’s get started.
First step is to install the Timeshift backup utility on your Ubuntu 22.04 System. To do this, open a command line terminal and execute the following two apt commands with root permissions.
$ sudo apt update
$ sudo apt install timeshift
Create Backup by using the Timeshift GUI
Create system backup
- Open the
timeshiftapplication via top leftActivitiesmenu. Upon opening thetimeshiftapplication you will be greeted with a wizard to help you schedule your backups. Here you have two options. First is to use thersyncprotocol as a main backup tool or take an advantage of an inherent BRTFS built-in file system features. In this example we will usersync. SelectRSYNCand hit theNextbutton.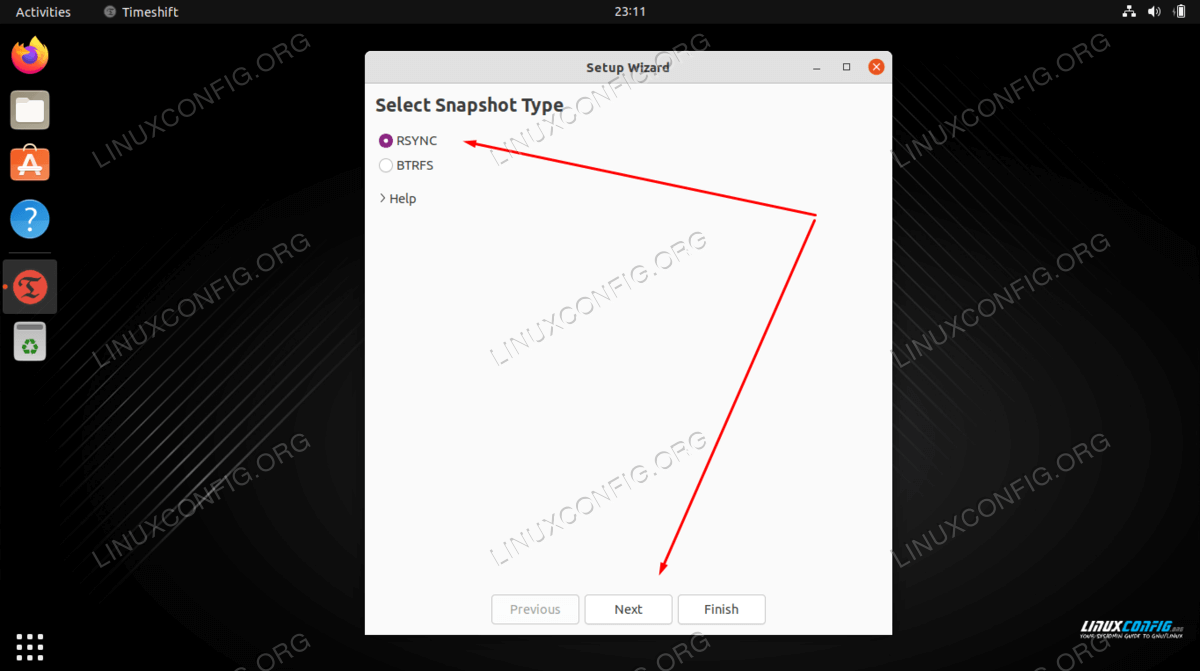
Choose your backup method and click Next NOTE
The rsync method will use hard links to make sure that repeat files from multiple backups do not take up extra space. So do not worry about each backup taking up a lot of space. The first backup will be by far the biggest one. - Select backup destination.
timeshiftwill search your system for available file system partitions and provide you with an option on where to create backup file.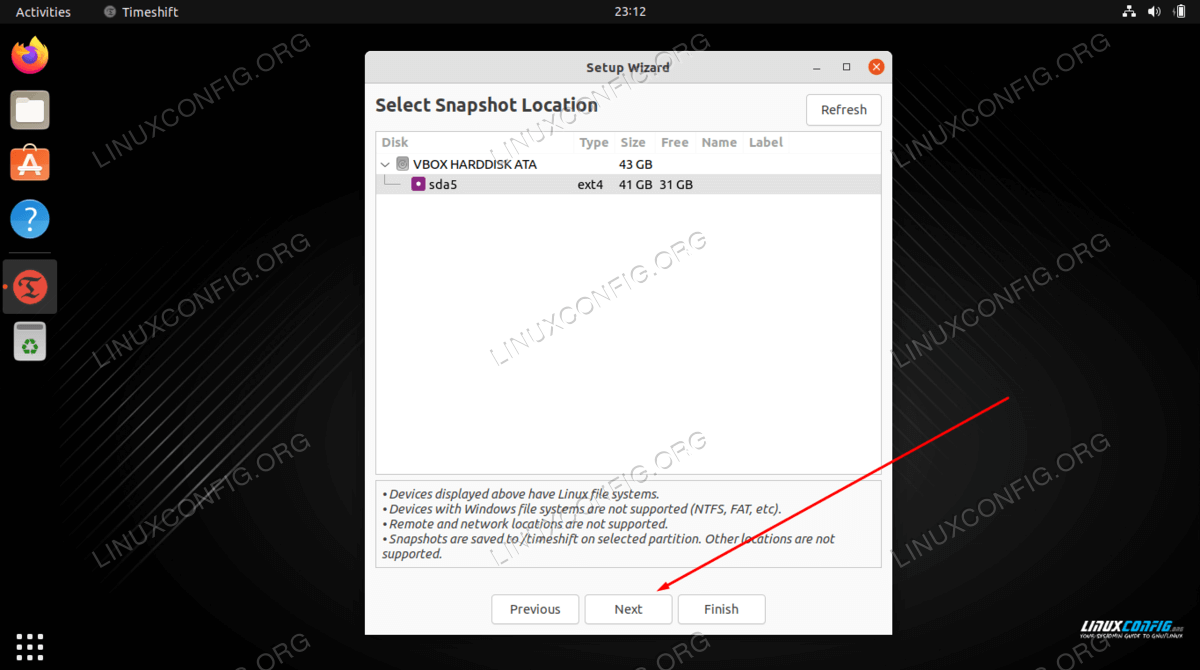
Select a location where you would like to store your snapshot - Select how often you wish to perform the system backup and how many
backup snapshots you wish to retrain before the first backup is
overwritten.

Select your snapshot levels in this menu before proceeding - As the screenshot indicates the home directories are excluded by
default. Depending on your work environment select whether you wish to
include home directories into the backup.

Decide if you would like to include files located in the home directories on your system
- This will conclude your initial backup schedule setup. Hit the
Finishbutton.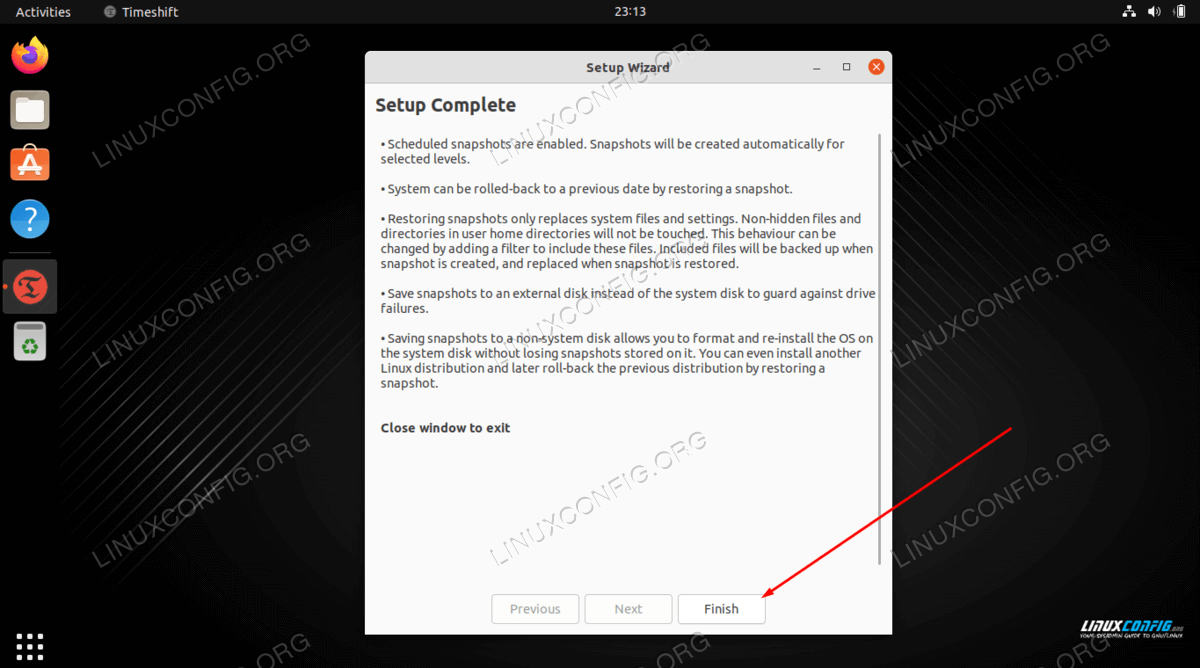
Click Finish to be done configuring your backup schedule - The backup has not been created yet. You can either wait until the
timeshiftautomatically triggers the backup or simply hit theCreatebutton to perform the previously predefined backup now.
Click on the Create button in order to create a backup right now - Wait for the backup to complete. This could take a few minutes.

Timeshift is now performing the backup - If all went well you should now see your first backup snapshot listed.
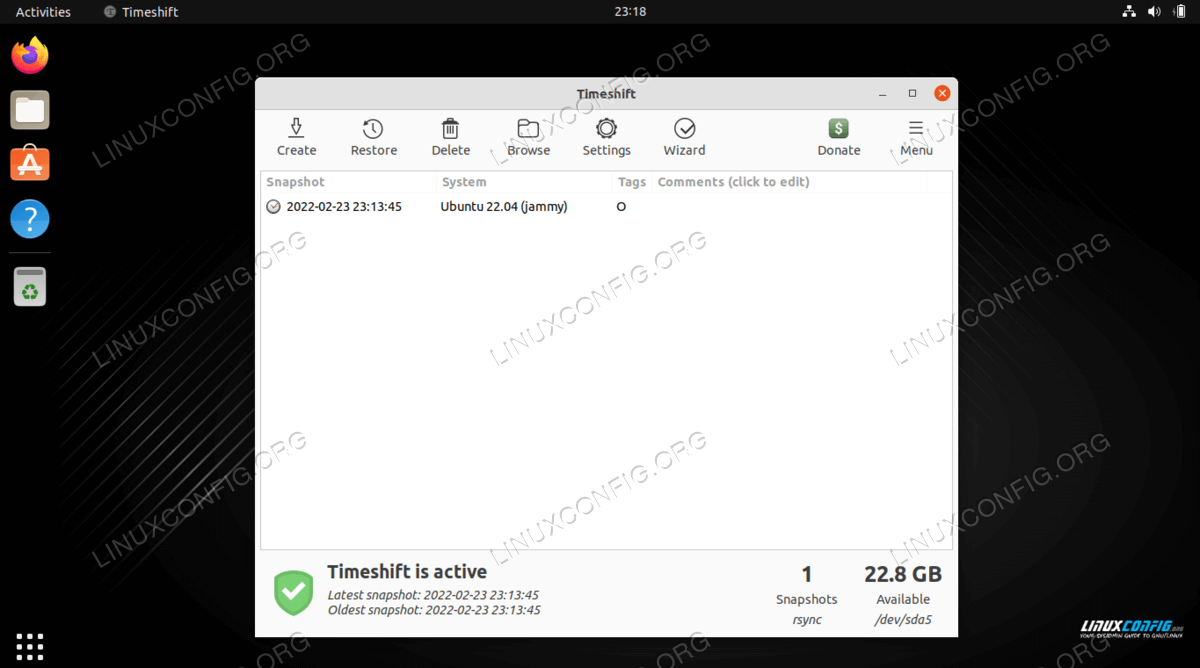
Timeshift shows the backup snapshot that we have just created -
Restore from backup
At this point we will restore the system from the previously created system backup snapshot. Select a backup snapshot from which you wish to restore and click on the
Restorebutton.
Highlight the desired backup and click on the Restore button - Timeshift give you an option on how to restore from your backup. Unless you know what you are doing simply hit the
Nextbutton to go with the default.

Click Next to proceed with the restore - The Timeshit application will provide you with a list of changes it
will take to restore from the backup just to make sure no data is lost
in the process.
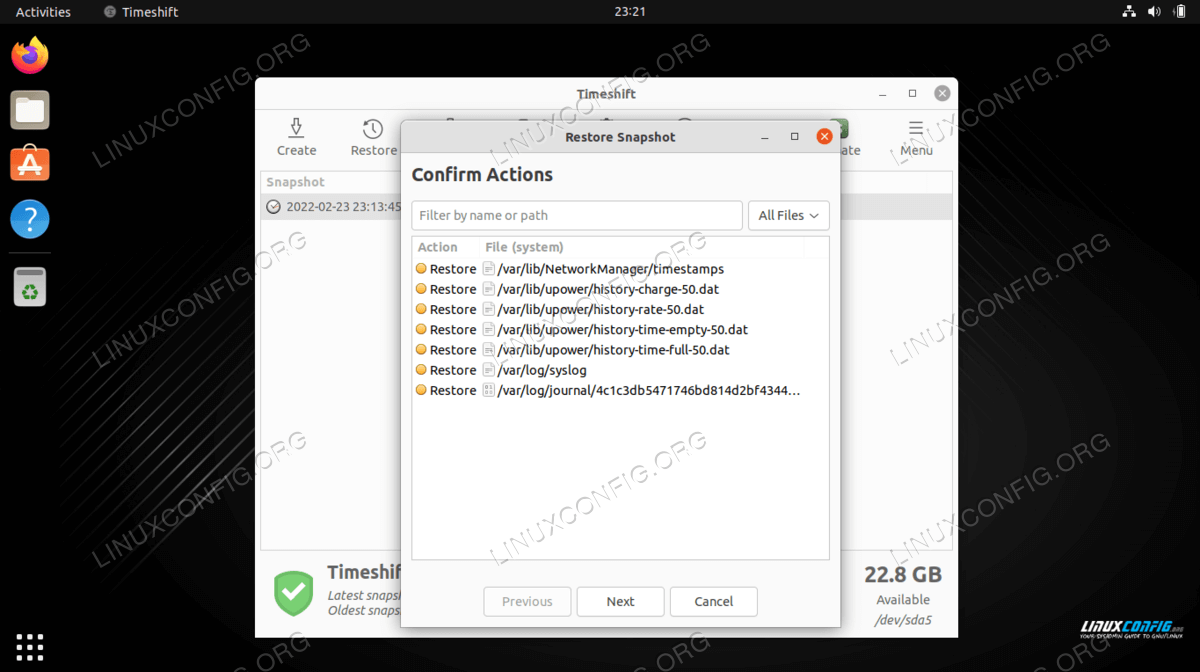
Confirm the changes and then hit Next to proceed - Once you hit the
Nextbutton the system will be restored and restarted. All done.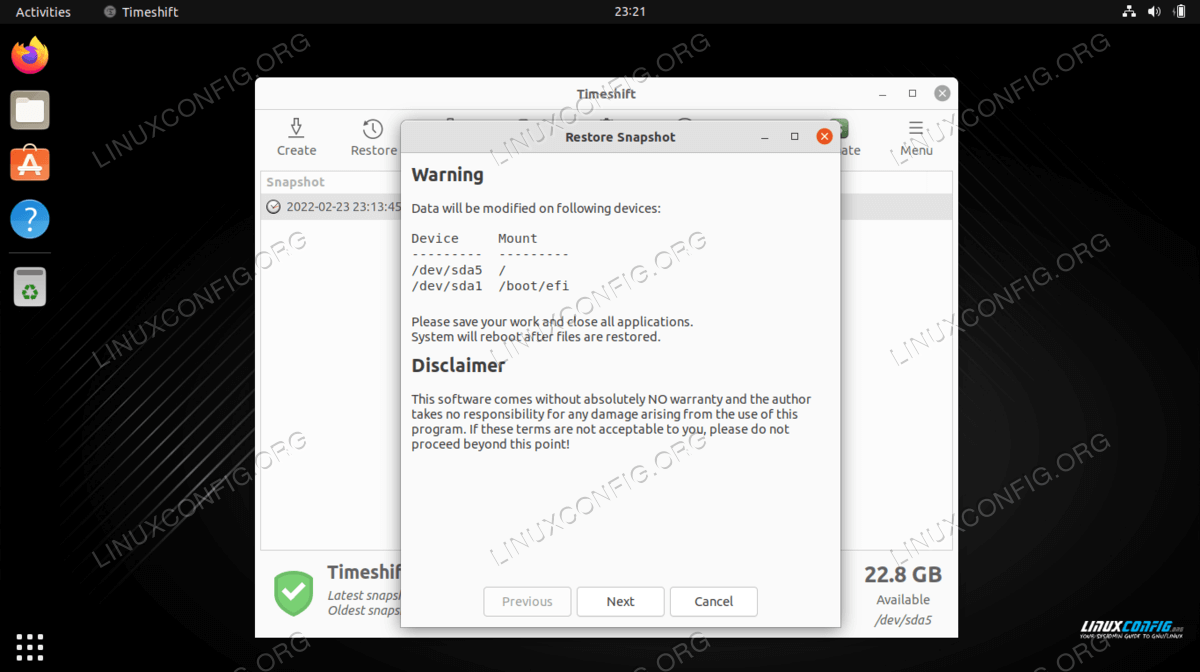
Click Next to finish restoring the backup snapshot
Create and restore backup by using the Timeshift’s command line
- Create a first backup simply by executing the below command:
$ sudo timeshift --create
The above command will also create a new configuration file located at the following location:
/etc/timeshift.json.The output will look something like this:
First run mode (config file not found)
Selected default snapshot type: RSYNC
Mounted /dev/sda2 at /media/root/359151f5-efb9-483d-a738-894d57e2d8c8.
Selected default snapshot device: /dev/sda2
------------------------------------------------------------------------------
Estimating system size...
Creating new snapshot...(RSYNC)
Saving to device: /dev/sda2, mounted at path: /media/root/359151f5-efb9-483d-a738-894d57e2d8c8
Synching files with rsync...
Created control file: /media/root/359151f5-efb9-483d-a738-894d57e2d8c8/timeshift/snapshots/2020-02-19_18-32-36/info.json
RSYNC Snapshot saved successfully (39s)
Tagged snapshot '2022-02-23_18-32-36': ondemand
- List all your currently created system backup screenshots:
$ sudo timeshift --list
The output:
Device : /dev/sda2
UUID   : 359151f5-efb9-483d-a738-894d57e2d8c8
Path   : /media/root/359151f5-efb9-483d-a738-894d57e2d8c8
Mode   : RSYNC
Device is OK
1 snapshots, 197.7 GB free

Num     Name                 Tags  Description
------------------------------------------------------------------------------
0    >  2022-02-23_18-32-36  O
- Restore from the backup snapshot:
$ sudo timeshift --restore --snapshot "2022-02-23_18-32-36"
- Delete selected backup snapshot:
$ sudo timeshift --delete --snapshot '2022-02-23_18-32-36'
Closing Thoughts
In this tutorial, we learned how to install the Timeshift application on Ubuntu 22.04 Jammy Jellyfish Linux and use the program to create a backup snapshot of our system files. We then saw how to restore the snapshot that we created. Timeshift is a great way to save the countless customization that you make to your Ubuntu 22.04 system in order to get it exactly the way you want. It provides peace of mind knowing that you can restore a previous snapshot any time that something goes awry.
Không có nhận xét nào:
Đăng nhận xét