Thứ Hai, 31 tháng 10, 2022

9 Lệnh Kiểm Tra Dung Lượng Ổ Cứng HDD Trên Linux


9 Lệnh Kiểm Tra Dung Lượng Ổ Cứng HDD Trên Linux

Trong bài viết này mình sẽ giới thiệu tới các bạn các câu lệnh kiểm tra dung lượng ổ cứng hdd cho các bạn mới và các bạn đã sử dụng linux lâu năm.

fdisk

Đây là câu lệnh có thể hiển thị chi tiết các partitions trên một ổ đĩa, câu lệnh thường được sử dụng để kiểm tra các partition, nhưng nhượt điểm của câu lệnh này không hiển thị dung lượng của từng partition. Sau đây là ví dụ về cậu lệnh fdisk

$ sudo fdisk -l

Disk /dev/sda: 500.1 GB, 500107862016 bytes
255 heads, 63 sectors/track, 60801 cylinders, total 976773168 sectors
Units = sectors of 1 * 512 = 512 bytes
Sector size (logical/physical): 512 bytes / 512 bytes
I/O size (minimum/optimal): 512 bytes / 512 bytes
Disk identifier: 0x30093008

   Device Boot      Start         End      Blocks   Id  System
/dev/sda1   *          63   146801969    73400953+   7  HPFS/NTFS/exFAT
/dev/sda2       146802031   976771071   414984520+   f  W95 Ext'd (LBA)
/dev/sda5       146802033   351614654   102406311    7  HPFS/NTFS/exFAT
/dev/sda6       351614718   556427339   102406311   83  Linux
/dev/sda7       556429312   560427007     1998848   82  Linux swap / Solaris
/dev/sda8       560429056   976771071   208171008   83  Linux

Disk /dev/sdb: 4048 MB, 4048551936 bytes
54 heads, 9 sectors/track, 16270 cylinders, total 7907328 sectors
Units = sectors of 1 * 512 = 512 bytes
Sector size (logical/physical): 512 bytes / 512 bytes
I/O size (minimum/optimal): 512 bytes / 512 bytes
Disk identifier: 0x0001135d

   Device Boot      Start         End      Blocks   Id  System
/dev/sdb1   *        2048     7907327     3952640    b  W95 FAT32

sfdisk

Câu lệnh sfdisk cũng tương tự như fdisk nhưng nó có nhiều tính năng hơn, nó có khả năng thể hiện dung lượng của từng partition và tính bằng đơn vị Mb

$ sudo sfdisk -l -uM

Disk /dev/sda: 60801 cylinders, 255 heads, 63 sectors/track
Warning: extended partition does not start at a cylinder boundary.
DOS and Linux will interpret the contents differently.
Units = mebibytes of 1048576 bytes, blocks of 1024 bytes, counting from 0

   Device Boot Start   End    MiB    #blocks   Id  System
/dev/sda1   *     0+ 71680- 71681-  73400953+   7  HPFS/NTFS/exFAT
/dev/sda2     71680+ 476938  405259- 414984520+   f  W95 Ext'd (LBA)
/dev/sda3         0      -      0          0    0  Empty
/dev/sda4         0      -      0          0    0  Empty
/dev/sda5     71680+ 171686- 100007- 102406311    7  HPFS/NTFS/exFAT
/dev/sda6     171686+ 271693- 100007- 102406311   83  Linux
/dev/sda7     271694  273645   1952    1998848   82  Linux swap / Solaris
/dev/sda8     273647  476938  203292  208171008   83  Linux

Disk /dev/sdb: 1020 cylinders, 125 heads, 62 sectors/track
Warning: The partition table looks like it was made
  for C/H/S=*/54/9 (instead of 1020/125/62).
For this listing I'll assume that geometry.
Units = mebibytes of 1048576 bytes, blocks of 1024 bytes, counting from 0

   Device Boot Start   End    MiB    #blocks   Id  System
/dev/sdb1   *     1   3860   3860    3952640    b  W95 FAT32
                start: (c,h,s) expected (4,11,6) found (0,32,33)
                end: (c,h,s) expected (1023,53,9) found (492,53,9)
/dev/sdb2         0      -      0          0    0  Empty
/dev/sdb3         0      -      0          0    0  Empty
/dev/sdb4         0      -      0          0    0  Empty

cfdisk

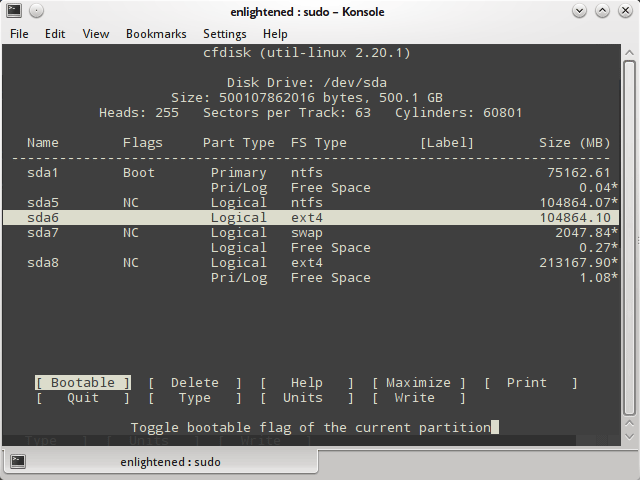
Là câu lệnh của phân vùng mở rộng trong linux, nó có giao diện dành cho người dùng tương tác dựa trên kernel của linux. Nó có các tính năng cao hơn sfdisk ở chỗ nó có thể chỉnh sửa hoặc tạo ra các partition.

Dưới đây là một ví dụ về cách sử dụng cfdisk để liệt kê các phân vùng.

linux-cfdisk

Nó có thể làm việc với một phân vùng tại một thời điểm cụ thể, bạn có thể xem chi tiết của một ổ đĩa

$ sudo cfdisk /dev/sdb

parted

đây là một câu lệnh để vượt ra giới hạn, có thể điều chỉnh thêm các partiton nếu cần thiết. Nó có thể liệt kê chi tiết các partion, dưới đây là ví dụ cụ thể về câu lệnh parted

$ sudo parted -l
Model: ATA ST3500418AS (scsi)
Disk /dev/sda: 500GB
Sector size (logical/physical): 512B/512B
Partition Table: msdos

Number  Start   End     Size    Type      File system     Flags
 1      32.3kB  75.2GB  75.2GB  primary   ntfs            boot
 2      75.2GB  500GB   425GB   extended                  lba
 5      75.2GB  180GB   105GB   logical   ntfs
 6      180GB   285GB   105GB   logical   ext4
 7      285GB   287GB   2047MB  logical   linux-swap(v1)
 8      287GB   500GB   213GB   logical   ext4


Model: Sony Storage Media (scsi)
Disk /dev/sdb: 4049MB
Sector size (logical/physical): 512B/512B
Partition Table: msdos

Number  Start   End     Size    Type     File system  Flags
 1      1049kB  4049MB  4048MB  primary  fat32        boot

df

đây là câu lệnh thường được dùng nhất trên hệ thống để kiểm tra dung lượng hdd, nó không hiển thị chi tiết các phân vùng nhưng nó có thể hiện thị chi tiết các thư mục được liên kết, nó có nhiều option các bạn có thể tự nghiên cứu nhé

$ df -h
Filesystem      Size  Used Avail Use% Mounted on
/dev/sda6        97G   43G   49G  48% /
none            4.0K     0  4.0K   0% /sys/fs/cgroup
udev            3.9G  8.0K  3.9G   1% /dev
tmpfs           799M  1.7M  797M   1% /run
none            5.0M     0  5.0M   0% /run/lock
none            3.9G   12M  3.9G   1% /run/shm
none            100M   20K  100M   1% /run/user
/dev/sda8       196G  154G   33G  83% /media/13f35f59-f023-4d98-b06f-9dfaebefd6c1
/dev/sda5        98G   37G   62G  38% /media/4668484A68483B47

ở ví dụ trên, các thiết bị được bắt đầu bằng /dev mới là các thiết bị thực tế nên chúng ta cần lọc ra để xem cho dễ hơn

$ df -h | grep ^/dev
/dev/sda6        97G   43G   49G  48% /
/dev/sda8       196G  154G   33G  83% /media/13f35f59-f023-4d98-b06f-9dfaebefd6c1
/dev/sda5        98G   37G   62G  38% /media/4668484A68483B47

để xem chi tiết các phân vùng thật và kiểu của phần vùng ta dùng câu lệnh như sau:

$ df -h --output=source,fstype,size,used,avail,pcent,target -x tmpfs -x devtmpfs
Filesystem     Type     Size  Used Avail Use% Mounted on
/dev/sda6      ext4      97G   43G   49G  48% /
/dev/sda8      ext4     196G  154G   33G  83% /media/13f35f59-f023-4d98-b06f-9dfaebefd6c1
/dev/sda5      fuseblk   98G   37G   62G  38% /media/4668484A68483B47

chú ý: nó chỉ hiện thị các phân vùng được liên kết chứ không hẳn là tất cả đều đã được hiển thị trong câu lệnh df này nhé.

pydf

đây là một phiên bản cải tiến từ fd, nó được viết từ python, nó có nhiều ưu điểm hơn df ở chỗ nó có thể hiển thị tất cả các partition và dễ đọc, nhưng nó chỉ hiển thị các tập tin được liên kết thôi.

$ pydf
Filesystem Size Used Avail Use%             Mounted on                                 
/dev/sda6   96G  43G   48G 44.7 [####.....] /                                          
/dev/sda8  195G 153G   32G 78.4 [#######..] /media/13f35f59-f023-4d98-b06f-9dfaebefd6c1
/dev/sda5   98G  36G   61G 37.1 [###......] /media/4668484A68483B47

lsblk

nó liệt kê ra các block bao gồm các partition và ổ đĩa quang, nó thể hiện dung lượng tổng kích thước của các partition và block và các phân vùng được liên kết nếu có. Nó không trả về dung lượng còn trống và dung lượng đã sử dụng

$ lsblk
NAME   MAJ:MIN RM   SIZE RO TYPE MOUNTPOINT
sda      8:0    0 465.8G  0 disk 
├─sda1   8:1    0    70G  0 part 
├─sda2   8:2    0     1K  0 part 
├─sda5   8:5    0  97.7G  0 part /media/4668484A68483B47
├─sda6   8:6    0  97.7G  0 part /
├─sda7   8:7    0   1.9G  0 part [SWAP]
└─sda8   8:8    0 198.5G  0 part /media/13f35f59-f023-4d98-b06f-9dfaebefd6c1
sdb      8:16   1   3.8G  0 disk 
└─sdb1   8:17   1   3.8G  0 part 
sr0     11:0    1  1024M  0 rom

Nếu câu lệnh trả về mà không có bất kỳ MOUNTPOINT nào thì nghĩa là không có bất kỳ file hệ thống nào được mout, đối với cd/dvd nghĩa là không có bất kỳ ổ đĩa nào tồn tại trong hệ thống.

Câu lệnh nó hiển thị về thông tin của mỗi thiết bị cũng như tên, đời của thiết bị.

blkid

câu lệnh trên trả về thông tin từng block của partition ( các partiton và các không gian lưu trữ media ) các thuộc tính giống như là uuid và loại file. Nó không trả về dung lượng của các partition

$ sudo blkid
/dev/sda1: UUID="5E38BE8B38BE6227" TYPE="ntfs" 
/dev/sda5: UUID="4668484A68483B47" TYPE="ntfs" 
/dev/sda6: UUID="6fa5a72a-ba26-4588-a103-74bb6b33a763" TYPE="ext4" 
/dev/sda7: UUID="94443023-34a1-4428-8f65-2fb02e571dae" TYPE="swap" 
/dev/sda8: UUID="13f35f59-f023-4d98-b06f-9dfaebefd6c1" TYPE="ext4" 
/dev/sdb1: UUID="08D1-8024" TYPE="vfat"

hwinfo

đây là câu lệnh trả về các thông tin chính của phần cứng, nó được dùng để trả về thông tin của các ổ đĩa và danh sách các partition, tuy nhiên nó không đưa ra thông tin chi tiết về từng partiton như các câu lệnh ở trên.

$ hwinfo --block --short
disk:                                                           
  /dev/sda             ST3500418AS
  /dev/sdb             Sony Storage Media
partition:
  /dev/sda1            Partition
  /dev/sda2            Partition
  /dev/sda5            Partition
  /dev/sda6            Partition
  /dev/sda7            Partition
  /dev/sda8            Partition
  /dev/sdb1            Partition
cdrom:
  /dev/sr0             SONY DVD RW DRU-190A

Tóm Lược:

Tất cả các câu lệnh trên trả về thông tin tóm tắt về các phần cứng, về các phân vùng khác nhau, hệ thống tập tin, dung lượng tổng. pydf và df nó giới hạn hiển thị, chỉ hiển thị các file hệ thống được gắn kết ( mount ).

fdisk và sfdisk thì cho chúng ta rất nhiều thông tin. cfdisk thì chỉ hiện thị một phân vùng tại một thời điểm nhất định.
How to resize ext4 root partition live without umount on Linux


How to resize ext4 root partition live without umount on Linux

This article will focus on how to resize EXT4 root partition without unmount. This is an easy way for some system where you are unable to unmount root partition and the system can be recovered easily if something goes wrong like for example AWS instance.

Resizing any live partition without unmout comes with a tremendous risk of loosing data thus it is not recommended. If you a have a sensitive data stored on your system, it is always recommended to take the system down make a backup and resize the partition while it is not mounted.

In the following example we are going to resize a partition of a fresh single partition AWS Linux instance. The current partition size is 7.8GB:

# df -h .
Filesystem      Size  Used Avail Use% Mounted on
/dev/xvda1      7.8G  642M  6.8G   9% /

However, the disk size reports 20GB:

# fdisk -l

Disk /dev/xvda: 20 GiB, 21474836480 bytes, 41943040 sectors
Units: sectors of 1 * 512 = 512 bytes
Sector size (logical/physical): 512 bytes / 512 bytes
I/O size (minimum/optimal): 512 bytes / 512 bytes
Disklabel type: dos
Disk identifier: 0xd7f2e0e8

Device     Boot Start      End  Sectors Size Id Type
/dev/xvda1 *     4096 16773119 16769024   8G 83 Linux

The above partition is mounted as root and thus the partition cannot be unmount:

# umount /
umount: /: target is busy.
        (In some cases useful info about processes that use
         the device is found by lsof(8) or fuser(1))

All what needs to be done is take a note of a starting sector of a current partition, which in our case is 4096. Remove the partition and recreate a new, larger partition starting from sector 4096. For this we are simply going to use fdisk command. Let’s start by printing again our current partition table:

# fdisk /dev/xvda

Welcome to fdisk (util-linux 2.25.2).                                                                                                                                                           
Changes will remain in memory only, until you decide to write them.
Be careful before using the write command.

Command (m for help): p
Disk /dev/xvda: 20 GiB, 21474836480 bytes, 41943040 sectors
Units: sectors of 1 * 512 = 512 bytes
Sector size (logical/physical): 512 bytes / 512 bytes
I/O size (minimum/optimal): 512 bytes / 512 bytes
Disklabel type: dos
Disk identifier: 0xd7f2e0e8

Device     Boot Start      End  Sectors Size Id Type
/dev/xvda1 *     4096 16773119 16769024   8G 83 Linux

Once again please take a note of the starting sector 4096. Still in fdisk‘s interactive mode remove partition:

Command (m for help): d
Selected partition 1
Partition 1 has been deleted.


Next, create a new partition right on the top of the previous and ensure that you use same starting sector:

Command (m for help): n
Partition type
   p   primary (0 primary, 0 extended, 4 free)
   e   extended (container for logical partitions)
Select (default p): p
Partition number (1-4, default 1): 
First sector (2048-41943039, default 2048): 4096
Last sector, +sectors or +size{K,M,G,T,P} (4096-41943039, default 41943039): 

Created a new partition 1 of type 'Linux' and of size 20 GiB.

Make the partition 1 bootable and print new partition table:

Command (m for help): a
Selected partition 1
The bootable flag on partition 1 is enabled now.

Command (m for help): p
Disk /dev/xvda: 20 GiB, 21474836480 bytes, 41943040 sectors
Units: sectors of 1 * 512 = 512 bytes
Sector size (logical/physical): 512 bytes / 512 bytes
I/O size (minimum/optimal): 512 bytes / 512 bytes
Disklabel type: dos
Disk identifier: 0xd7f2e0e8

Device     Boot Start      End  Sectors Size Id Type
/dev/xvda1 *     4096 41943039 41938944  20G 83 Linux

Confirm all new details and write new partition table:

Command (m for help): w
The partition table has been altered.
Calling ioctl() to re-read partition table.
Re-reading the partition table failed.: Device or resource busy

The kernel still uses the old table. The new table will be used at the next reboot or after you run partprobe(8) or kpartx(8).

At this point the system needs to be rebooted in order to remount our root partition with a new size. Force fsck on next reboot to ensure that the partition is checked before it is mounted. To do so just create an empty file called forcefsck in the root of your / partition:

# touch /forcefsck

Reboot your system. Once the system is up again check the partition size:

df -h .
Filesystem      Size  Used Avail Use% Mounted on
/dev/xvda1       20G  644M   19G   4% /

and last fsck check:

# tune2fs -l /dev/xvda1

Ubuntu 22.04 System Backup and Restore


Ubuntu 22.04 System Backup and Restore

The purpose of this tutorial is to show how to install Timeshift on Ubuntu 22.04 Jammy Jellyfish and use the program to perform a backup of the system, and subsequently restore the system from that backup.

Most Linux users love to customize their Linux system to their liking. If your system becomes unusable, all of this work put into customizing your system will be lost, because you have to reinstall Ubuntu and start over.

Timeshift is an application that will backup your system settings and files. It does NOT backup personal files. Taking a snapshot with Timeshift will allow you to browse that snapshot any time, like you would a normal directory of files. If your system gets corrupted or goes through some undesirable change, it is easy to restore your system as it was by using Timeshift.

Let’s see how to install Timeshift on Ubuntu 22.04 Jammy Jellyfish and make a backup of our system files.

In this tutorial you will learn:

  • How to install Timeshift on Ubuntu 22.04
  • How to use Timeshift to create a backup snapshot
  • How to restore a Timeshift snapshot backup
  • How to use Timeshift from the command line
Using Timeshift to make a system backup on Ubuntu 22.04 Jammy Jellyfish
Software Requirements and Linux Command Line Conventions
Category Requirements, Conventions or Software Version Used
System Ubuntu 22.04 Jammy Jellyfish
Software Timeshift
Other Privileged access to your Linux system as root or via the sudo command.
Conventions # – requires given linux commands to be executed with root privileges either directly as a root user or by use of sudo command
$ – requires given linux commands to be executed as a regular non-privileged user

Ubuntu 22.04 System Backup and Restore step by step instructions


Using the following steps we will first create system backup of the Ubuntu 22.04 system using the Timeshift graphical user interface. Later we will restore from the previously created system backup snapshot. Let’s get started.

First step is to install the Timeshift backup utility on your Ubuntu 22.04 System. To do this, open a command line terminal and execute the following two apt commands with root permissions.

$ sudo apt update
$ sudo apt install timeshift

Create Backup by using the Timeshift GUI

Create system backup

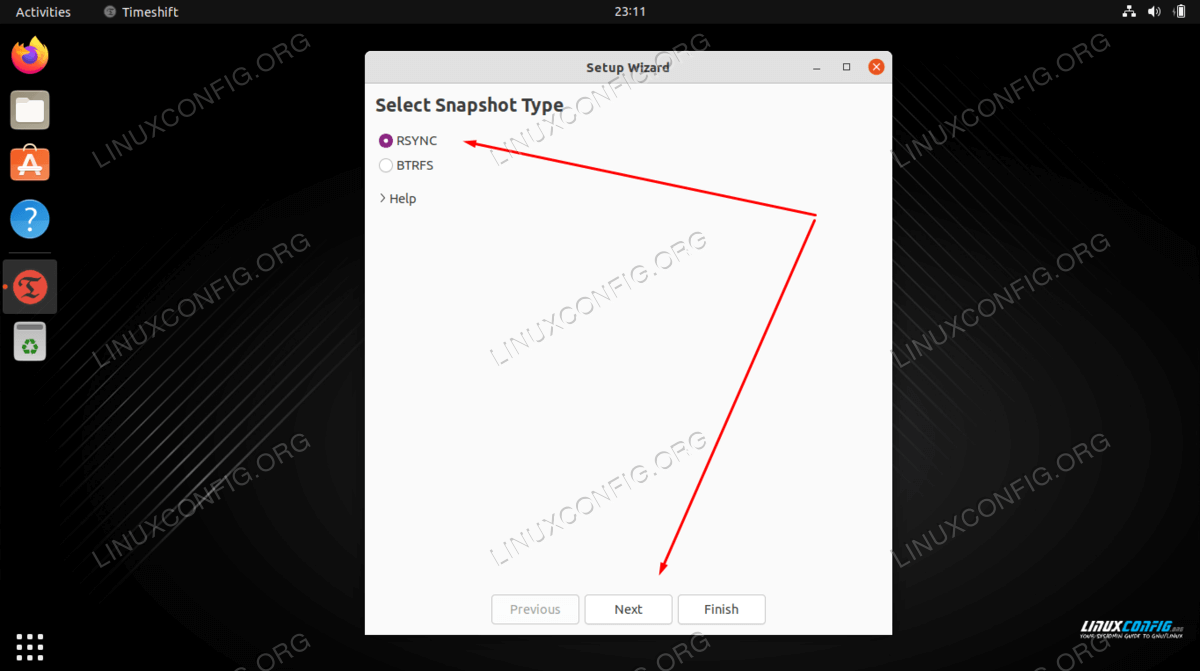
  1. Open the timeshift application via top left Activities menu. Upon opening the timeshift application you will be greeted with a wizard to help you schedule your backups. Here you have two options. First is to use the rsync protocol as a main backup tool or take an advantage of an inherent BRTFS built-in file system features. In this example we will use rsync. Select RSYNC and hit the Next button.
    Choose your backup method and click Next
    Choose your backup method and click Next
    NOTE
    The rsync method will use hard links to make sure that repeat files from multiple backups do not take up extra space. So do not worry about each backup taking up a lot of space. The first backup will be by far the biggest one.
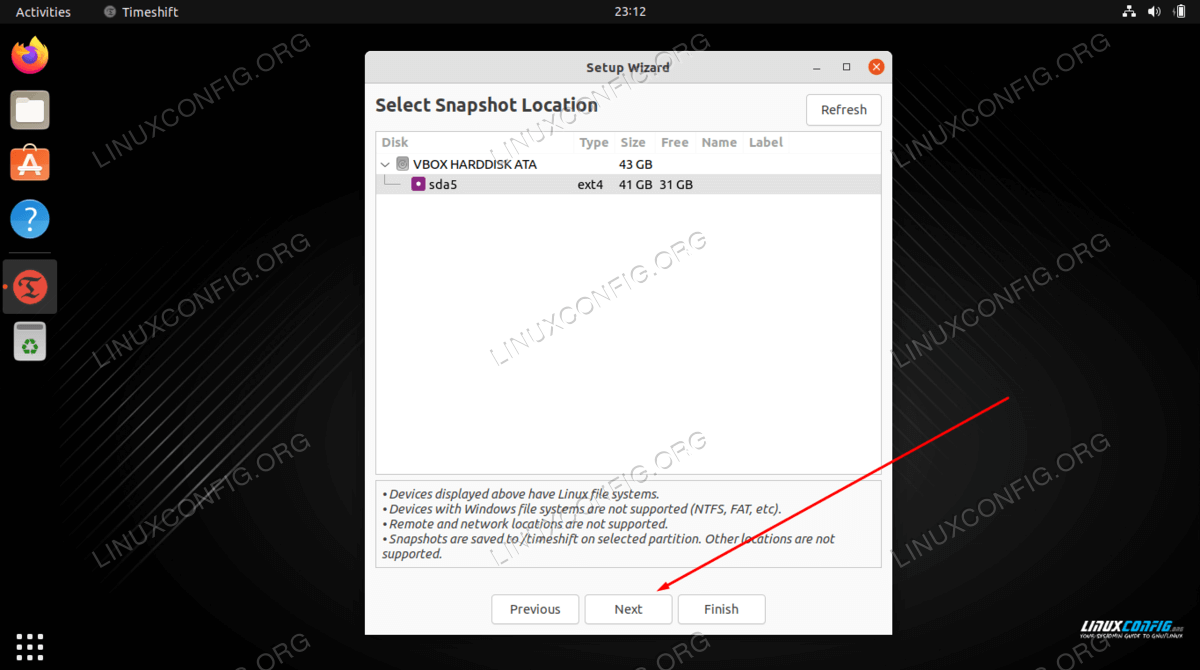
  2. Select backup destination. timeshift will search your system for available file system partitions and provide you with an option on where to create backup file.
    Select a location where you would like to store your snapshot
    Select a location where you would like to store your snapshot
  3. Select how often you wish to perform the system backup and how many backup snapshots you wish to retrain before the first backup is overwritten.
    Select your snapshot levels in this menu before proceeding
    Select your snapshot levels in this menu before proceeding
  4. As the screenshot indicates the home directories are excluded by default. Depending on your work environment select whether you wish to include home directories into the backup.

    Decide if you would like to include files located in the home directories on your system
    Decide if you would like to include files located in the home directories on your system


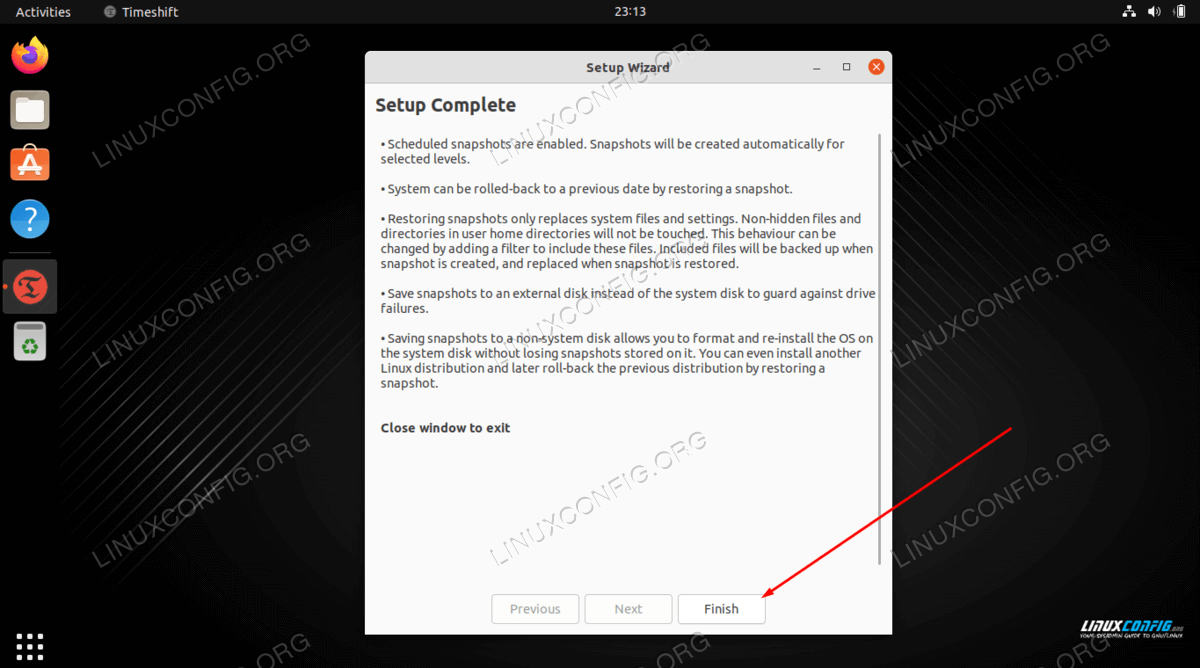
  5. This will conclude your initial backup schedule setup. Hit the Finish button.
    Click Finish to be done configuring your backup schedule
    Click Finish to be done configuring your backup schedule
  6. The backup has not been created yet. You can either wait until the timeshift automatically triggers the backup or simply hit the Create button to perform the previously predefined backup now.
    Click on the Create button in order to create a backup right now
    Click on the Create button in order to create a backup right now
  7. Wait for the backup to complete. This could take a few minutes.
    Timeshift is now performing the backup
    Timeshift is now performing the backup
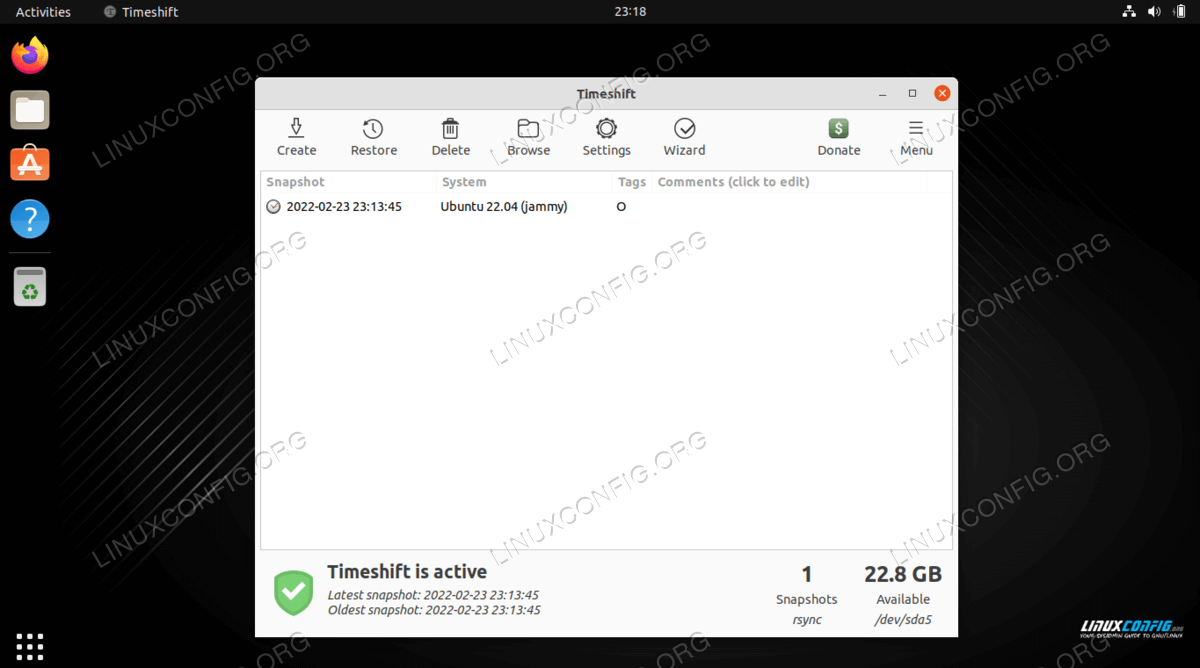
  8. If all went well you should now see your first backup snapshot listed.
    Timeshift shows the backup snapshot that we have just created
    Timeshift shows the backup snapshot that we have just created
  9. Restore from backup

    At this point we will restore the system from the previously created system backup snapshot. Select a backup snapshot from which you wish to restore and click on the Restore button.

    Highlight the desired backup and click on the Restore button
    Highlight the desired backup and click on the Restore button
  10. Timeshift give you an option on how to restore from your backup. Unless you know what you are doing simply hit the Next button to go with the default.


    Click Next to proceed with the restore
    Click Next to proceed with the restore

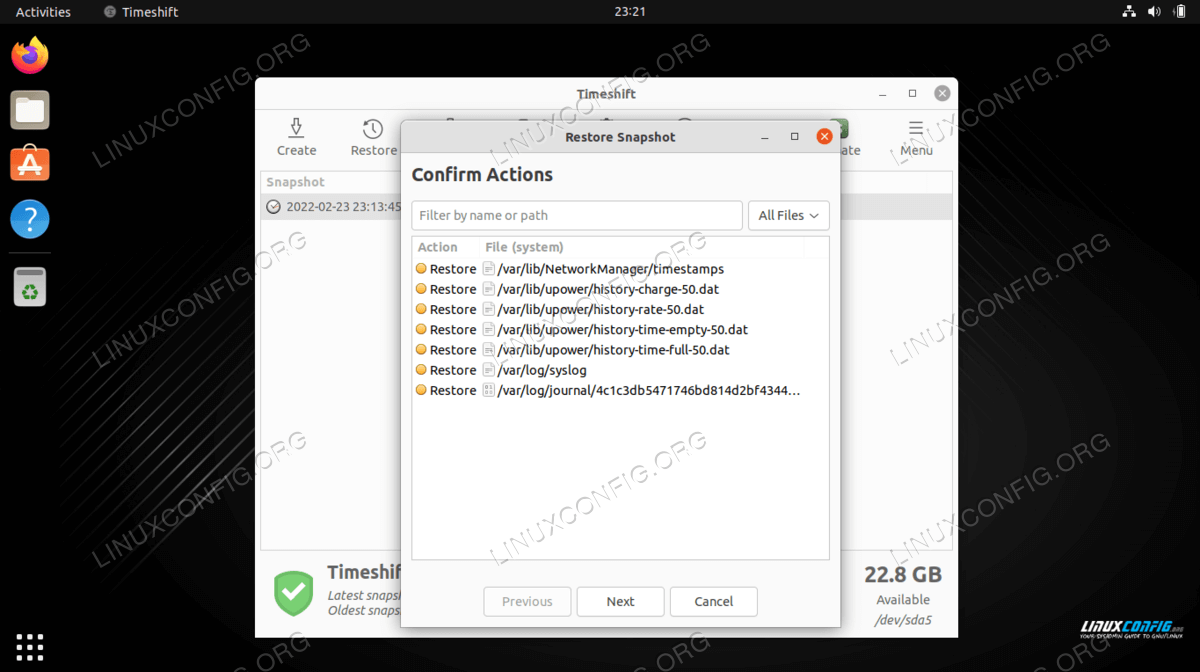
  11. The Timeshit application will provide you with a list of changes it will take to restore from the backup just to make sure no data is lost in the process.
    Confirm the changes and then hit Next to proceed
    Confirm the changes and then hit Next to proceed
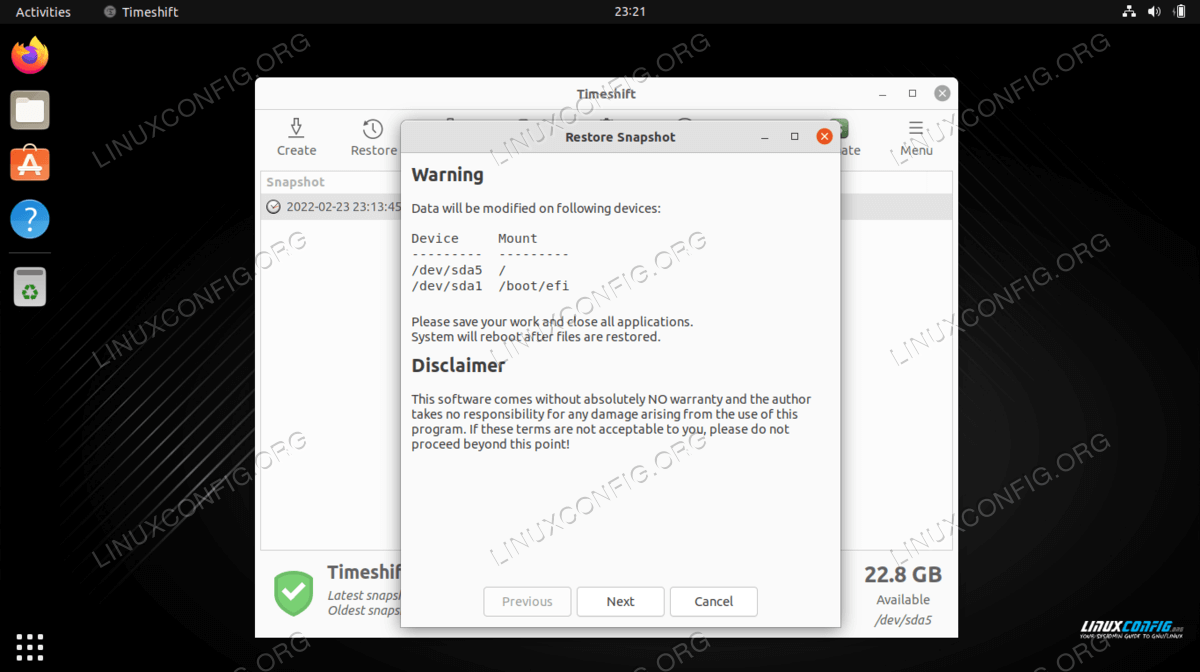
  12. Once you hit the Next button the system will be restored and restarted. All done.
    Click Next to finish restoring the backup snapshot
    Click Next to finish restoring the backup snapshot

Create and restore backup by using the Timeshift’s command line

  1. Create a first backup simply by executing the below command:
    $ sudo timeshift --create
    

    The above command will also create a new configuration file located at the following location: /etc/timeshift.json.

    The output will look something like this:

    First run mode (config file not found)
    Selected default snapshot type: RSYNC
    Mounted /dev/sda2 at /media/root/359151f5-efb9-483d-a738-894d57e2d8c8.
    Selected default snapshot device: /dev/sda2
    ------------------------------------------------------------------------------
    Estimating system size...
    Creating new snapshot...(RSYNC)
    Saving to device: /dev/sda2, mounted at path: /media/root/359151f5-efb9-483d-a738-894d57e2d8c8
    Synching files with rsync...
    Created control file: /media/root/359151f5-efb9-483d-a738-894d57e2d8c8/timeshift/snapshots/2020-02-19_18-32-36/info.json
    RSYNC Snapshot saved successfully (39s)
    Tagged snapshot '2022-02-23_18-32-36': ondemand


  2. List all your currently created system backup screenshots:
    $ sudo timeshift --list
    

    The output:

    Device : /dev/sda2
    UUID   : 359151f5-efb9-483d-a738-894d57e2d8c8
    Path   : /media/root/359151f5-efb9-483d-a738-894d57e2d8c8
    Mode   : RSYNC
    Device is OK
    1 snapshots, 197.7 GB free
    
    Num     Name                 Tags  Description  
    ------------------------------------------------------------------------------
    0    >  2022-02-23_18-32-36  O 
    
  3. Restore from the backup snapshot:
    $ sudo timeshift --restore --snapshot "2022-02-23_18-32-36"
    
  4. Delete selected backup snapshot:
    $ sudo timeshift --delete  --snapshot '2022-02-23_18-32-36'
    

Closing Thoughts


In this tutorial, we learned how to install the Timeshift application on Ubuntu 22.04 Jammy Jellyfish Linux and use the program to create a backup snapshot of our system files. We then saw how to restore the snapshot that we created. Timeshift is a great way to save the countless customization that you make to your Ubuntu 22.04 system in order to get it exactly the way you want. It provides peace of mind knowing that you can restore a previous snapshot any time that something goes awry.

Thứ Ba, 25 tháng 10, 2022

Ps trong Linux


Ps trong Linux là gì?

Ps là từ viết tắt của Process Status hay là Process trong Linux đơn giản là một chương trình đang được vận hành. Mỗi phiên bản của một chương trình này là một process. Trình duyệt, trình phát nhạc hay là trình soạn thảo văn bản của bạn là tất cả các ví dụ về các process đang chạy cùng một lúc.

Lệnh ps trong Linux sẽ không có bất kỳ đối số nào hiển thị các process đang chạy trong phiên hiện tại.

Lệnh ps trong Linux là gì?

Chúng ta có thể thấy bốn tham số được hiển thị về các process đang chạy:

  • PID: process ID.
  • TTY: Loại terminal.
  • TIME: Tổng thời gian process đã chạy.
  • CMD: tên của lệnh khởi chạy process.

Process thứ hai sẽ thực sự là lệnh ps trong Linux. Mọi lệnh mà chúng ta chạy trong terminal đều được Linux coi là một process.

Xem thêm: Các công lệnh trong Linux

banner hosting gif

Công dụng lệnh ps trong Linux

Nhận thêm thông tin về các quy trình

Lệnh ps trong Linux có thể được sử dụng với tùy chọn -u để hiển thị thêm thông tin về các quy trình.

$ ps -u
ps trong linux

Bây giờ cùng với PID, TTY, TIME, COMMAND, chúng ta có một số thông tin khác về các quy trình, chẳng hạn như USER,% CPU,% MEM.

  • %CPU đại diện cho sức mạnh tính toán mà quá trình đang sử dụng.
  • %MEM đại diện cho số lượng bộ nhớ mà quá trình đang sử dụng.
  • STAT đại diện cho trạng thái quá trình.

Định dạng hiển thị này được gọi là kiểu BSD.

Hiển thị các quy trình do người dùng hiện tại sở hữu

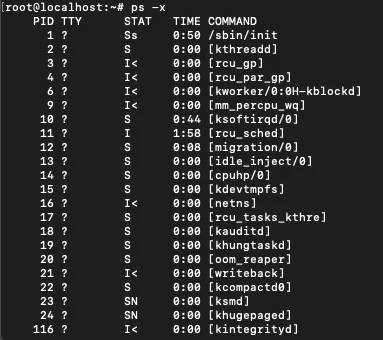
Lệnh này sẽ hiển thị tất cả các tiến trình thuộc sở hữu của người dùng đang chạy lệnh ps trong Linux.

$ ps -x
lệnh ps trong linux

Đây là những quy trình do người dùng sở hữu (trong trường hợp này là root). Những quy trình này không cần thiết phải chạy. Có một cách để liệt kê các quy trình cho người dùng và nhóm khác, chúng tôi sẽ đề cập cách này ở phần sau của bài viết.

Dùng lệnh ps trong Linux -u flag với -x flag

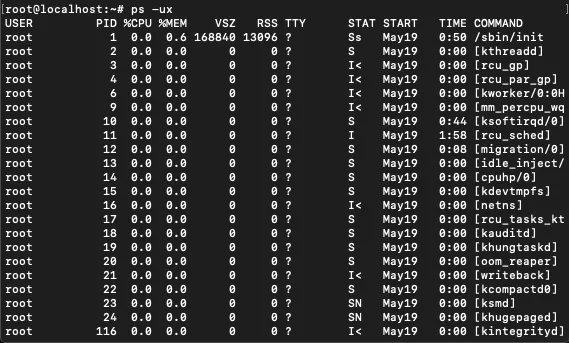
ps-ux là sự kết hợp hai lệnh bạn có thể đoán. Nó hiển thị thêm thông tin về các quy trình do người dùng sở hữu.

$ ps -ux
process trong linux

Trên thực tế, -u flag hầu như luôn được kết hợp với một số flag khác để có thêm các thông tin.

Liệt kê tất cả các quy trình trên hệ thống

Lệnh này sẽ hiển thị tất cả các quy trình trên hệ thống. Điều này sẽ không giới hạn danh sách các quy trình cho người dùng hiện tại hoặc các quy trình đang chạy.

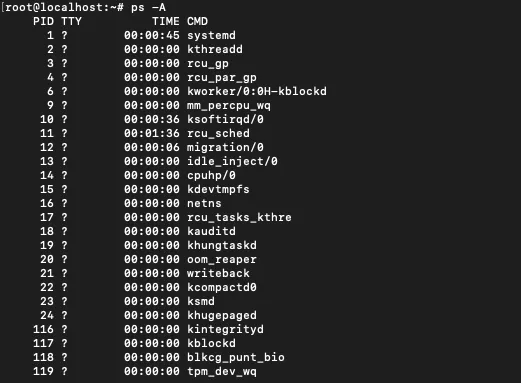
$ ps -A

Hoặc

$ ps -e
sử dụng ps để liệt kê các quy trình trên hệ thống

Để in process tree dùng lệnh sau:

$ ps -eH 
process tree

Hoặc

$ ps -e --forest
process forest

ps -eH hiển thị các quy trình theo hệ thống phân cấp của chúng. Trong khi ps-e –forest hiển thị quy trình ở định dạng ASCII in chúng ra theo dạng cây.

Threads

Trong Linux, một thread là một phiên bản của chương trình đang được thực thi. Một quy trình có thể có nhiều thread.

Sử dụng lệnh ps trong Linux bạn cũng có thể liệt kê các thread.

$ ps -H

Lệnh này sẽ hiển thị các thread như thể chúng là các quy trình.

theards
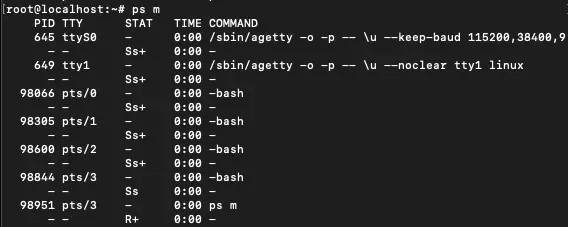
$ ps -m

Hiển thị các thread sau các quy trình.

$ ps -T

Hiển thị các thread với SPID của chúng, là thread id và có thể giống như PID trong trường hợp chỉ có một thread.

Full format listing và extra full format listing

$ ps -f 

Lệnh này sẽ liệt kê thông tin về các quy trình theo cách liệt kê định dạng đầy đủ. Danh sách các định dạng đầy đủ hiển thị UID, PPID, C và STIME cùng với TIME, CMD và PID.

ps f
$ ps -F

Lệnh này liệt kê thông tin về các quy trình theo cách liệt kê định dạng đầy đủ hơn. Chúng ta có thể so sánh kết quả trước đó và xem thông tin bổ sung mà extra full format listing đang cung cấp.

Như bạn có thể thấy rằng chúng chúng ta hiện đang nhận được PPID và PID.

  • RSS là mức sử dụng bộ nhớ thực.
  • SIZE là mức sử dụng bộ nhớ ảo.
  • TIME là thời gian bắt đầu của quá trình.

Lệnh này có thể được kết hợp với -e và được sử dụng như lệnh ps -eF để nhận thông tin định dạng đầy đủ về tất cả các quy trình. Rất dễ để bị nhầm lẫn ps -f và ps -F với cùng một lệnh.

Quá trình xác định dựa trên PID

Bạn có thể hiển thị quy trình tương ứng với một PID cụ thể bằng cách sử dụng:

$ ps -fp [pid] 

Điều này sẽ hiển thị các quy trình với thông tin và định dạng đầy đủ. Bạn cũng có thể sử dụng ps -Fp [pid] để hiển thị các quy trình có thêm thông tin định dạng đầy đủ.

ps pid

Bạn có thể nhận được nhiều quy trình bằng cách đề cập đến nhiều PID được phân tách bằng dấu phẩy.

$ ps -fp [pid1],[pid2],[pid3] 

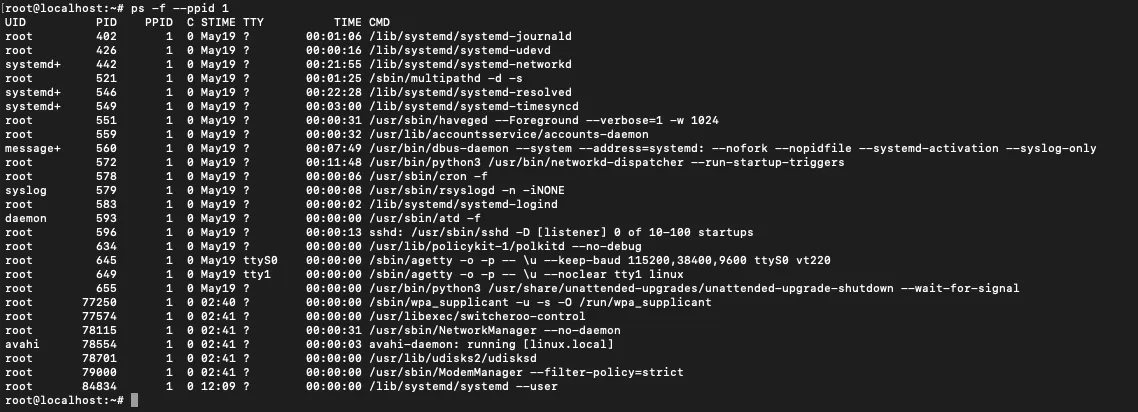
Quá trình xác định dựa trên PID gốc (PPID). Bạn có thể hiển thị các quy trình tương ứng với một PPD cụ thể bằng cách sử dụng:

$ ps -f --ppid [ppid]
ps trong linux ppid

Điều này hiển thị tất cả các quy trình với ID gốc là 1.

Hiển thị quá trình theo tên lệnh

Các quá trình có thể được chọn dựa trên tên lệnh:

$ ps -C [cmd name]
sử dụng ps hiển thị quá trình tên lệnh

Để hiển thị tất cả các quy trình cho một người dùng cụ thể:

$ ps -U [user_name]

Để hiển thị tất cả các quy trình cho một nhóm cụ thể:

$ ps -G [group_name] 

Kết luận

Lệnh ps trong Linux là một lệnh rất hữu ích và quan trọng. Nó có thể được sử dụng để quản lý các quy trình trong Linux. Còn rất nhiều điều cần tìm hiểu về lệnh ps, đây chỉ là một số trường hợp sử dụng lệnh ps trong Linux. Có thể tìm thấy thêm tài liệu về lệnh ps trong Linux ở nhiều trang web học tập khác nhau. Chúc các bạn thành công.

Sao lưu, đồng bộ file và thư mục với WinSCP


 File ftpscript.txt

option batch continue
option confirm off
open admin@192.168.1.42
synchronize remote "E:\Backup" "/media/DATA/BK"
exit

 .........................................................

File ftp.cmd

echo off

setlocal

set year=%date:~10,4%

set month=%date:~4,2%

set day=%date:~7,2%

set h=%time:~0,2%

set h=%h: =0%

set m=%time:~3,2%

set filename=log_%year%%month%%day%%h%%m%.txt

E:\WinSCP\winscp.com /script=E:\WinSCP\Scripts\ftpscript.txt >> E:\WinSCP\logs\%filename%

open ftp://user_ftp:pass_ftp@ip_ftp

synchronize remote [Source]  [Target]

exit

Thay thế các thông tin user_ftp, pass_ftp, ip_ftp bằng các thông tin tương ứng.

 https://winscp.net/eng/docs/task_synchronize 

https://winscp.net/eng/docs/task_synchronize_full

https://winscp.net/eng/docs/task_keep_up_to_date

https://winscp.net/eng/docs/scripting

https://winscp.net/eng/docs/scriptcommand_synchronize

..........................................................

File backup.cmd

echo off

setlocal

set year=%date:~10,4%

set month=%date:~4,2%

set day=%date:~7,2%

set h=%time:~0,2%

set h=%h: =0%

set m=%time:~3,2%

set filename=B7R2_%year%%month%%day%.rar
echo %filename%
E:\WinSCP\WinSCP.com ^
  /log="E:\WinSCP\WinSCP.log" /ini=nul ^
  /command ^
    "open sftp://admin:Password@192.168.1.42/ -hostkey=""ssh-ed25519 255 eusLUlvUyZC+VnuPmjHwoyNbxX9PfOUQ7kx3Jpmd9K8""" ^
    "put E:\Backup\%filename% /media/DATA/BK/" ^
    "exit"

set WINSCP_RESULT=%ERRORLEVEL%
if %WINSCP_RESULT% equ 0 (
  echo Success
) else (
  echo Error
)

exit /b %WINSCP_RESULT%

Giới thiệu giải pháp sao lưu, đồng bộ file và thư mục

Nhằm mục đích chia s kinh nghiệm trong công tác sao lưu, phục hồi các nguồn dữ liệu của cá nhân nói riêng và các nguồn dữ liệu của Tổng công ty Điện lực miền Nam nói chung, Công ty CNTT (SPCIT) hướng dẫn giải pháp đồng bộ file, thư mục bằng phần mềm WinSCP. Giải pháp đưa ra với giả định cần backup hoặc synchonize thư mục từ source đến target hoặc từ target đến source, trong đó target là thư mục được đặt ở FTP hoặc SFTP hoặc SCP.

Hiện nay có rất nhiều công cụ để đồng bộ như: FTPVoyager, SyncBackPro, WinScp..., tuy nhiên đa phần là có phí, nếu sử dụng miễn phí thì có FTPVoyager của hãng Solarwinds nhưng tốc độ copy dữ liệu khá chậm, SyncBackPro thì phải mất phí. Trong các phần mềm miễn phí có WinScp là chương trình dùng để copy dữ liệu với tốc độ nhanh, giao diện đơn giản và có đầy đủ tài liệu, chỉ cần đọc tài liệu và lập lịch trong windows/linux thì chúng ta có thể biến WinScp thành một công cụ hữu ích trong việc tự động đồng bộ  file cũng như thư mục chúng ta mong muốn. Sau đây hướng dẫn chi tiết:

Để thực hiện đầu tiên ta phải có phần mềm WinSCP, vào trang https://winscp.net/eng/download.php vào mục Download, phiên bản hiện tại là 5.17 (như hình dưới)


Tiếp theo ta chọn [Other Download], mình thường sử dụng WinScp dạng file portable để không cần cài đặt, tìm đến mục [Portable executable] và bấm nút download

Sau khi download về ta giải nén đến một thư mục cần làm việc, tuy nhiên cần sửa lại đường dẫn trong file script phía dưới, ở đây mình giải nén đến ổ D:\Softs\WinScp (như hình)


Bước tiếp theo là viết script file để thực thi, tạo một file có tên [winscpput.txt], sau đó gõ các dòng lệnh sau (gõ sau dấu nháy):

open ftp://user_ftp:pass_ftp@ip_ftp

synchronize remote [Source]  [Target]

exit

Thay thế các thông tin user_ftp, pass_ftp, ip_ftp bằng các thông tin tương ứng. Trong đó [Source] là thư mục cần backup, [Target] là nơi lưu trữ backup. Lưu file này vào thư mục D:\Softs\WinScp\Script. Ở đoạn lệnh trên nếu ta thay synchronize remote thành synchronize local thì sẽ chép file từ target về source.

Tiếp theo tạo file có tên [ScriptPut.bat] và open with file bằng notepad, sau đó gõ các lệnh sau (gõ sau dấu nháy):

echo off

setlocal

set year=%date:~10,4%

set month=%date:~4,2%

set day=%date:~7,2%

set h=%time:~0,2%

set h=%h: =0%

set m=%time:~3,2%

set filename=log_%year%%month%%day%%h%%m%.txt

"D:\Softs\WinSCP\winscp.com" /script=D:\Softs\WinScp\Script\winscpput.txt >> D:\Soft\Winscp\logs\%filename%

Lưu file này trong ổ D:\Softs\WinScp\Script. Lưu ý ta cần tạo thư mục [logs] trong ổ D:\Soft\Winscp\logs, mục đích khi WinScp thực thi sẽ tạo file log, chúng ta có thể đọc file log này để xác định xem tình hình đồng bộ, các lỗi.

Bước tiếp theo ta bấm vào file [ScriptPut.bat] để chạy thử, kiểm tra kết quả bằng cách xem log file trong thư mục [logs].

Để tự động hóa trong việc đồng bộ, ta tiến hành lập lịch (Scheduler) trong windows, trong quá trình lập lịch khi đến bước [Start Program] ta trỏ đến file [ScriptPut.bat] mà ta tạo lúc nãy.


Ngoài ra cần cho phép chạy task scheduler chạy với quyền cao nhất và không cần hỏi password. Bấm OK để kết thúc. Như vậy chúng ta đã lập xong một task tự động thực thi vào thời gian mà đã lập lịch.

Trên đây là các bước cơ bản để thực hiện việc backup, đồng bộ giữa 2 thư mục source và target, người dùng có thể vào trang https://winscp.net/eng/docs/start để tìm hiểu thêm các lệnh command line và gắn vào script trên. 


Synchronization Direction

There are three possible directions (targets) of synchronization.

With Local direction, changes from remote directory (source) are applied to local directory (target). Only the local directory is modified.

Remote mode is the same as Local, just in an opposite direction: changes from the local directory (source) are applied to the remote directory (target). Only the remote directory is modified.

In Both mode, both local and remote directories can be modified (both can act as both source and target).

 
Command Description
call Executes arbitrary remote shell command
cd Changes remote working directory
checksum Calculates checksum of remote file
chmod Changes permissions of remote file
close Closes session
cp Duplicates remote file
echo Prints message onto script output
exit Closes all sessions and terminates the program
get Downloads file from remote directory to local directory
help Displays help
keepuptodate Continuously reflects changes in local directory on remote one
lcd Changes local working directory
lls Lists the contents of local directory
ln Creates remote symbolic link
lpwd Prints local working directory
ls Lists the contents of remote directory
mkdir Creates remote directory
mv Moves or renames remote file
open Connects to server
option Sets or shows value of script options
put Uploads file from local directory to remote directory
pwd Prints remote working directory
rm Removes remote file
rmdir Removes remote directory
session Lists connected sessions or selects active session
stat Retrieves attributes of remote file
synchronize Synchronizes remote directory with local one    

The Console Interface Tool

Learn about winscp.com, the console interface tool.

Verifying the Host Key or Certificate in Script

The first connection to an SSH server requires verification of the host key. To automate the verification in script, use -hostkey switch of open command to accept the expected host key automatically.

You can find the key fingerprint on Server and Protocol Information Dialog. You can also copy the key fingerprint to clipboard from the confirmation prompt on the first (interactive) connection using Copy key fingerprints to clipboard command (in the script, use SHA-256 fingerprint of the host key only). Learn more about obtaining host key fingerprint.

FTPS/WebDAVS TLS/SSL certificate signed by untrusted authority may also need to be verified. To automate the verification in script, use -certificate switch of open command to accept the expected certificate automatically.

Running a Script under a Different Account (e.g., Using a Scheduler)

If you are going to run the script under a different account (for example using the Windows Task Scheduler), make sure the script does not rely on a configuration settings that might differ on the other account. When using registry as configuration storage, the settings are accessible only for your Windows account. Ideally, make sure the script does not rely on any external configuration, to make it completely portable. Note that the configuration also includes verified SSH host keys and FTPS/WebDAVS TLS/SSL certificates.

For details, see the next section and Why does WinSCP not work in a new environment (operating system, machine, user account, network), when it works for me in a different environment already?

Sharing Configuration with Graphical Mode

In scripting/console mode, WinSCP shares configuration with graphical mode by default. While this can be useful in some cases, it can also be a disadvantage.

The disadvantage is that change to configuration in graphical mode may break your script (common example is enabling Existing files only option for synchronization). Also the script is not portable to other machines, when it relies on an external configuration.

If you want to protect your script from such inadvertent change or if you want to make the script portable, you should isolate its configuration from graphical mode explicitly.

The best way to do that is to configure all the options you need using script commands only (option command, switches of other commands, session URL), or if no such command is available, using raw site settings and raw configuration. Finally force scripting mode to start with the default configuration using /ini=nul command-line parameter.

Alternatively export your configuration to a separate INI file and reference it using /ini= command-line parameter. Also consider setting the INI file read-only, to prevent WinSCP writing to it, when exiting. Particularly, if you are running multiple scripts in parallel, to prevent different instances of WinSCP trying to write it at the same time.

Generating Script

You can have WinSCP generate a script template for you.

Advertisement

Example

In the example below, WinSCP connects to example.com server with account user, downloads file and closes the session. Then it connects to the same server with the account user2 and uploads the file back.

# Connect
open sftp://user:password@example.com/ -hostkey="ssh-rsa 2048 xxxxxxxxxxx..."
# Change remote directory
cd /home/user
# Download file to the local directory d:\
get examplefile.txt d:\
# Disconnect
close
# Connect as a different user
open sftp://user2:password@example.com/
# Change the remote directory
cd /home/user2
# Upload the file to current working directory
put d:\examplefile.txt 
# Disconnect
close
# Exit WinSCP
exit

Save the script to the file example.txt. To execute the script file use the following command.

winscp.com /ini=nul /script=example.txt

For simple scripts you can specify all the commands on command-line using /command switch:

winscp.com /ini=nul /command "open sftp://user:password@example.com/ -hostkey=""ssh-rsa 2048 xxxxxxxxxxx...""" "get examplefile.txt d:\" "exit"

In Windows batch file, you can use ^ to split too long command-line to separate lines by escaping following new-line character:

winscp.com /ini=nul /command ^
    "open sftp://user:password@example.com/ -hostkey=""ssh-rsa 2048 xxxxxxxxxxx...""" ^
    "get examplefile.txt d:\" ^
    "exit"

See other useful example scripts.

Converting Script to Code Based on .NET Assembly

When you find yourself limited by scripting capabilities, you may consider converting your script to code that uses WinSCP .NET assembly
 

Test băng thông với

 https://iperf.fr/iperf-download.php

 Trên máy chủ

iperf3 -s

iperf3 -s -i 1 -w 2M

client

iperf3 -c 192.168.7.44
perf -c 10.10.34.173 -u -b 10000m -i1 -t 100 -m
iperf3 -c 192.168.7.44 -w 2M -t 100 -i 1

Giải thích tham số câu lệnh :

-c: địa chỉ host của iperf server (10.10.34.173)

-u: dùng giao thức UDP

-b: giá trị băng thông tối đa là 1000 Mbits

-i: khoảng thời gian giữa 2 lần report kết quả theo giây (1s)

-t: thời gian thực hiện đẩy traffic theo giây (100s)

-m: in ra MTU header

Kiểm tra trên network traffic của cả client và server. Sử dụng câu lệnh để nload để xem traffic network.

1. Lệnh nload

Lệnh nload hiển thị mức sử dụng mạng hiện tại.

Bạn đang xem: Hướng dẫn sử dụng iperf để test băng thông giữa 2 điểm

Cài đặt:

Trên Centos / RHEL

yum install epel-releaseyum install nloadTrên Ubuntu / Debian

apt install nloadTrên Fedora

dnf install nloadSử dụng:

nloadhoặcnload eth0

Key Shortcuts:

Sử dụng các nút mũi tên, Tab, Enter để chuyển đổi giữa các interface mạngF2: Hiển thị cửa sổ optionF5: Lưu setting hiện tại vào file cấu hình của người dùngF6: reload settings từ file cấu hìnhDùng q hoặc Ctrl + C để thoát.

Các option:

-m: Hiển thị nhiều card cùng lúc

nload -m-a: đặt độ dài tính bằng giây của cửa sổ thời gian để tính trung bình (mặc định là 300)

nload -a 400-t: Thay đổi thời gian làm mới interval theo mili giây. Mặc định là 500 (nếu giảm xuống dưới 100 thì giá trị sẽ không chính xác.)

nload -ma 400 -t 600devices: Có thể chỉ định card mạng cụ thể bằng lệnh sau: (Mặc định là tất cả các card mạng)

nload devices ens33

Trên Debian/Ubuntu

apt-get install iperf

Trên CentOS/Fedora

yum install epel-release -y
yum install iperf -y

Các option:

-c: chỉ ra địa chỉ IP của server để iperf kết nối đến

-f,--format: Chỉ ra định dạng của kết quả hiển thị. ‘b’ = bps, ‘B’ = Bps, ‘k’ = Kbps, ‘K’ = KBps,…

-i,--interval: Thời gian lấy mẫu để hiển thị kết quả tại thời điểm đó ra màn hình

-p,--port: Định ra cổng để nghe, mặc định nếu không sử dụng tham số này là cổng 5001

-u,--udp: Sử dụng giao thức UDP, mặc định iperf sử dụng TCP

-P,--parallel: Chỉ ra số kết nối song song được tạo, nếu là Server mode thì đây là giới hạn số kết nối mà server chấp nhận

-b: Định ra băng thông tối ta có thể truyền, chỉ sử dụng với UDP, client mode

-t: Tổng thời gian của kết nối, tính bằng giây

-M: Max segment size

-l: Buffer size

-w,--window: Trường Windows size của TCP


Quản lý Server IBM bằng IMM qua mạng

 Quản lý Server IBM bằng IMM qua mạng

Để quản lý Server IBM qua port mạng IMM thì bạn tham khảo tài liệu bên dưới!


http://download.boulder.ibm.com/ibmd...de_60y1465.pdf

Cách cấu hình:

1. Vào CMOS
2. Chọn System Setting
3. Chọn IMM Module
4. Đặt IP và Save lại (kéo thanh trươt xuống để thấy nút Save)

Reboot


Thông tin truy cập mật định!

http://192.168.70.125

username: USERID

password: PASSW0RD

Chú ý: mật khẩu là số 0 chứ không phải chử O

Thứ Năm, 6 tháng 10, 2022

Scheduling Cron Jobs with Crontab


Scheduling Cron Jobs with Crontab

Updated  

7 min read

Cron is a scheduling daemon that executes tasks at specified intervals. These tasks are called cron jobs and are mostly used to automate system maintenance or administration.

For example, you could set a cron job to automate repetitive tasks such as backing up databases or data, updating the system with the latest security patches, checking the disk space usage , sending emails, and so on.

The cron jobs can be scheduled to run by a minute, hour, day of the month, month, day of the week, or any combination of these.

What is Crontab File

Crontab (cron table) is a text file that specifies the schedule of cron jobs. There are two types of crontab files. The system-wide crontab files and individual user crontab files.

Users’ crontab files are named according to the user’s name, and their location varies by operating systems. In Red Hat based distributions such as CentOS, crontab files are stored in the /var/spool/cron directory, while on Debian and Ubuntu files are stored in the /var/spool/cron/crontabs directory.

Although you can edit the user crontab files manually, it is recommended to use the crontab command.

The /etc/crontab file and the scripts inside the /etc/cron.d directory are system-wide crontab files that can be edited only by the system administrators.

In most Linux distributions you can also put scripts inside the /etc/cron.{hourly,daily,weekly,monthly} directories, and the scripts will be executed every hour/day/week/month.

Crontab Syntax and Operators

Each line in the user crontab file contains six fields separated by a space followed by the command to be run.

* * * * * command(s)
- - - - -
| | | | |
| | | | ----- Day of week (0 - 7) (Sunday=0 or 7)
| | | ------- Month (1 - 12)
| | --------- Day of month (1 - 31)
| ----------- Hour (0 - 23)
------------- Minute (0 - 59)

The first five fields may contain one or more values, separated by a comma or a range of values separated by a hyphen.

  • * - The asterisk operator means any value or always. If you have the asterisk symbol in the Hour field, it means the task will be performed each hour.
  • , - The comma operator allows you to specify a list of values for repetition. For example, if you have 1,3,5 in the Hour field, the task will run at 1 am, 3 am and 5 am.
  • - - The hyphen operator allows you to specify a range of values. If you have 1-5 in the Day of week field, the task will run every weekday (From Monday to Friday).
  • / - The slash operator allows you to specify values that will be repeated over a certain interval between them. For example, if you have */4 in the Hour field, it means the action will be performed every four hours. It is same as specifying 0,4,8,12,16,20. Instead of asterisk before the slash operator, you can also use a range of values, 1-30/10 means the same as 1,11,21.

System-wide Crontab Files

The syntax of system-wide crontab files is slightly different than user crontabs. It contains an additional mandatory user field that specifies which user will run the cron job.

* * * * * <username> command(s)

Predefined Macros

There are several special Cron schedule macros used to specify common intervals. You can use these shortcuts in place of the five-column date specification.

  • @yearly (or @annually) - Run the specified task once a year at midnight (12:00 am) of the 1st of January. Equivalent to 0 0 1 1 *.
  • @monthly - Run the specified task once a month at midnight on the first day of the month. Equivalent to 0 0 1 * *.
  • @weekly - Run the specified task once a week at midnight on Sunday. Equivalent to 0 0 * * 0.
  • @daily - Run the specified task once a day at midnight. Equivalent to 0 0 * * *.
  • @hourly - Run the specified task once an hour at the beginning of the hour. Equivalent to 0 * * * *.
  • @reboot - Run the specified task at the system startup (boot-time).

Linux Crontab Command

The crontab command allows you to install, view , or open a crontab file for editing:

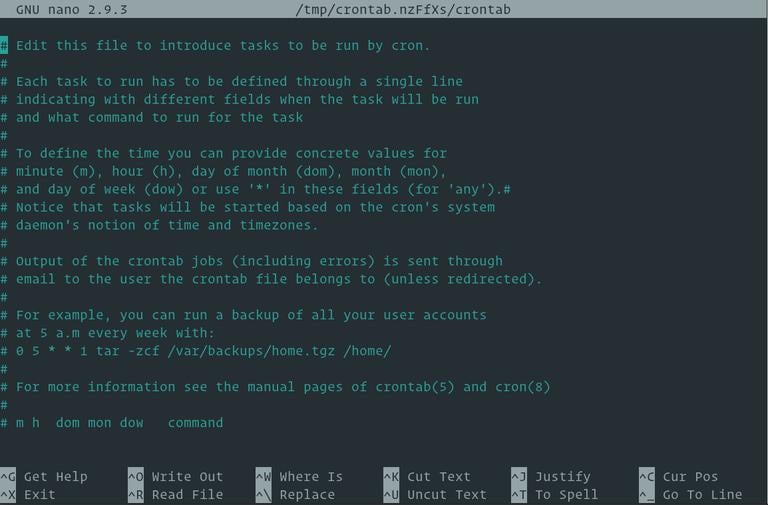
  • crontab -e - Edit crontab file, or create one if it doesn’t already exist.
  • crontab -l - Display crontab file contents.
  • crontab -r - Remove your current crontab file.
  • crontab -i - Remove your current crontab file with a prompt before removal.
  • crontab -u <username> - Edit other user crontab file. This option requires system administrator privileges.

The crontab command opens the crontab file using the editor specified by the VISUAL or EDITOR environment variables.

Create Cron Job

Crontab Variables

The cron daemon automatically sets several environment variables .

  • The default path is set to PATH=/usr/bin:/bin. If the command you are executing is not present in the cron specified path, you can either use the absolute path to the command or change the cron $PATH variable. You can’t implicitly append :$PATH as you would do with a regular script.
  • The default shell is set to /bin/sh. To change the different shell, use the SHELL variable.
  • Cron invokes the command from the user’s home directory. The HOME variable can be set in the crontab.
  • The email notification is sent to the owner of the crontab. To overwrite the default behavior, you can use the MAILTO environment variable with a list (comma separated) of all the email addresses you want to receive the email notifications. When MAILTO is defined but empty (MAILTO=""), no mail is sent.

Crontab Restrictions

The /etc/cron.deny and /etc/cron.allow files allows you to control which users have access to the crontab command. The files consist of a list of usernames, one user name per line.

By default, only the /etc/cron.deny file exists and is empty, which means that all users can use the crontab command. If you want to deny access to the crontab commands to a specific user, add the username to this file.

If the /etc/cron.allow file exists only the users who are listed in this file can use the crontab command.

If neither of the files exists, only the users with administrative privileges can use the crontab command.

Cron Jobs Examples

Below are some cron job examples that show how to schedule a task to run on different time periods.

  • Run a command at 15:00 on every day from Monday through Friday:

    0 15 * * 1-5 command
  • Run a script every 5 minutes and redirected the standard output to dev null, only the standard error will be sent to the specified e-mail address:

    MAILTO=email@example.com
    */5 * * * * /path/to/script.sh > /dev/null
  • Run two commands every Monday at 3 PM (use the operator && between the commands):

    0 15 * * Mon command1 && command2
  • Run a PHP script every 2 minutes and write the output to a file :

    */2 * * * * /usr/bin/php /path/to/script.php >> /var/log/script.log
  • Run a script every day, every hour, on the hour, from 8 AM through 4 PM:

    00 08-16 * * * /path/to/script.sh
  • Run a script on the first Monday of each month, at 7 a.m.

    0 7 1-7 * 1 /path/to/script.sh
  • Run the a script at 9:15pm, on the 1st and 15th of every month:

    15 9 1,15 * * /path/to/script.sh
  • Set custom HOME, PATH, SHELL and MAILTO variables and run a command every minute.

    HOME=/opt
    PATH=/usr/local/sbin:/usr/local/bin:/usr/sbin:/usr/bin:/sbin:/bin
    SHELL=/usr/bin/zsh
    MAILTO=email@example.com
    
    */1 * * * * command

Conclusion

Cron is a daemon that allows you to schedule tasks at a specific date and time.

Feel free to leave a comment if you have any questions.