Thứ Năm, 31 tháng 10, 2024

Fix lỗi remote desktop


https://learn.microsoft.com/en-us/troubleshoot/windows-server/remote/rdp-error-general-troubleshooting#check-whether-a-group-policy-object-gpo-is-blocking-rdp-on-a-local-computer


Windows Components/Remote Desktop Services/Remote Desktop Session Host/Connections
Allow users to connect remotely by using Remote Desktop Services      Enabled

Check the status of the RDP protocol on a local computer

Check the status of the RDP protocol on a remote computer

To check and change the status of the RDP protocol on a remote computer, use a network registry connection:

  1. First, go to the Start menu, then select Run. In the text box that appears, enter regedt32.

  2. In the Registry Editor, select File, then select Connect Network Registry.

  3. In the Select Computer dialog box, enter the name of the remote computer, select Check Names, and then select OK.

  4. Navigate to HKEY_LOCAL_MACHINE\SYSTEM\CurrentControlSet\Control\Terminal Server and to HKEY_LOCAL_MACHINE\SOFTWARE\Policies\Microsoft\Windows NT\Terminal Services.

    Screenshot of the Registry Editor showing the fDenyTSConnections entry.

    • If the value of the fDenyTSConnections key is 0, then RDP is enabled.
    • If the value of the fDenyTSConnections key is 1, then RDP is disabled.
  5. To enable RDP, change the value of fDenyTSConnections from 1 to 0

Check whether a Group Policy Object (GPO) is blocking RDP on a local computer

gpresult /H c:\gpresult.html

Check whether a GPO is blocking RDP on a remote computer

gpresult /S <computer name> /H c:\gpresult-<computer name>.html

Modifying a blocking GPO

To modify the blocking policy, use one of the following methods:

  • In GPE, access the appropriate level of GPO (such as local or domain), and navigate to Computer Configuration > Administrative Templates > Windows Components > Remote Desktop Services > Remote Desktop Session Host > Connections > Allow users to connect remotely by using Remote Desktop Services.
    1. Set the policy to either Enabled or Not configured.
    2. On the affected computers, open a command prompt window as an administrator, and run the gpupdate /force command.
  • In GPM, navigate to the organizational unit (OU) in which the blocking policy is applied to the affected computers and delete the policy from the OU.

Check the status of the RDP services

On both the local (client) computer and the remote (target) computer, the following services should be running:

  • Remote Desktop Services (TermService)
  • Remote Desktop Services UserMode Port Redirector (UmRdpService)

Check that the RDP listener is functioning

To connect to a remote computer, run the following cmdlet:

PowerShell
  • Enter-PSSession -ComputerName <computer name>
    
  • Enter qwinsta.

    Screenshot of the qwinsta command that lists the processes listening on the computer's ports.

  • If the list includes rdp-tcp with a status of Listen, the RDP listener is working. Proceed to Check the RDP listener port. Otherwise, continue at step 4.

  • Export the RDP listener configuration from a working computer.

    1. Sign in to a computer that has the same operating system version as the affected computer has, and access that computer's registry (for example, by using Registry Editor).

    2. Navigate to the following registry entry:

      HKEY_LOCAL_MACHINE\SYSTEM\CurrentControlSet\Control\Terminal Server\WinStations\RDP-Tcp

    3. Export the entry to a .reg file. For example, in Registry Editor, right-click the entry, select Export, and then enter a filename for the exported settings.

    4. Copy the exported .reg file to the affected computer.

  • To import the RDP listener configuration, open a PowerShell window that has administrative permissions on the affected computer (or open the PowerShell window and connect to the affected computer remotely).

    1. To back up the existing registry entry, enter the following cmdlet:

      PowerShell
  • cmd /c 'reg export "HKLM\SYSTEM\CurrentControlSet\Control\Terminal Server\WinStations\RDP-tcp" C:\Rdp-tcp-backup.reg'
    
  • To remove the existing registry entry, enter the following cmdlets:

    PowerShell
  • Remove-Item -path 'HKLM:\SYSTEM\CurrentControlSet\Control\Terminal Server\WinStations\RDP-tcp' -Recurse -Force
    
  • To import the new registry entry and then restart the service, enter the following cmdlets:

    PowerShell
    1. cmd /c 'regedit /s c:\<filename>.reg'
      Restart-Service TermService -Force
      

      Replace <filename> with the name of the exported .reg file.

    2. Test the configuration by trying the remote desktop connection again. If you still can't connect, restart the affected computer.

  • If you still can't connect, check the status of the RDP self-signed certificate.


  • 5 Phương pháp dễ dàng để tải xuống tệp bằng PowerShell

     5 Phương pháp dễ dàng để tải xuống tệp bằng PowerShell

    PowerShell là một công cụ mạnh mẽ không chỉ dành cho các chuyên gia CNTT—mà còn tuyệt vời nếu bạn muốn tự động hóa các tác vụ hoặc tải xuống tệp. Chúng cực kỳ hữu ích nếu bạn muốn có một cách nhanh chóng và đáng tin cậy để lấy tệp từ internet.

    Sau đây là các phương pháp dễ nhất để tải xuống tệp bằng PowerShell.

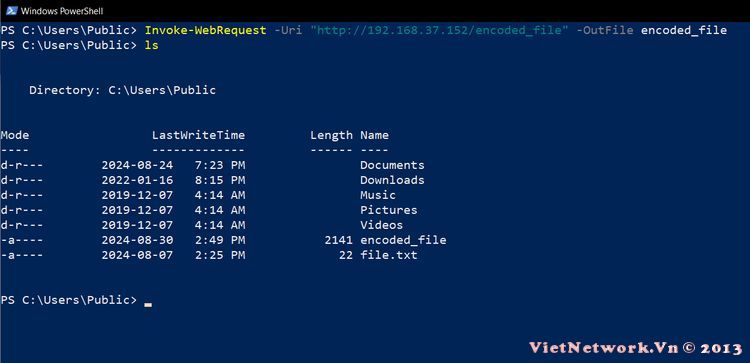
    1. Tải xuống với Invoke-WebRequest

    Một trong những cách đơn giản nhất để tải xuống tệp bằng PowerShell là sử dụng Invoke-WebRequest. Lệnh này được tích hợp vào PowerShell và hoàn hảo để tải xuống nhanh từ internet hoặc máy chủ cục bộ.

    Sau đây là cách thực hiện:

    Mã nguồn [Chọn]
    Invoke-WebRequest -Uri "https://example.com/file.zip" -OutFile "C:PathToSavefile.zip"
    • -Uri chỉ định liên kết đến tập tin.
    • -OutFile là nơi bạn chọn để lưu tệp.

    Phương pháp này rất hữu ích khi bạn cần một tập tin nhanh chóng và không muốn mất thời gian với các bước bổ sung.


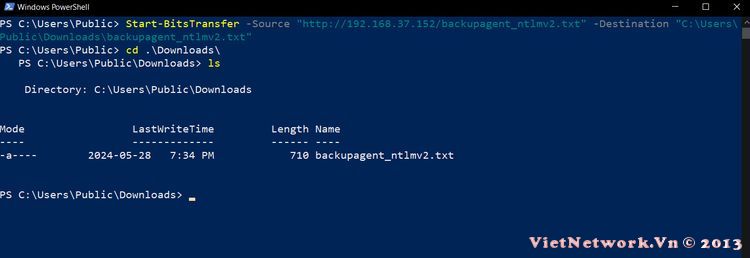
    2. Xử lý tập tin với Start-BitsTransfer

    Nếu bạn đang xử lý các tệp lớn hơn, nhiều tệp hoặc kết nối internet không ổn định, Start-BitsTransfer là tùy chọn bền bỉ hơn. Lệnh này tự động xử lý các lần thử lại nếu có sự cố xảy ra trong quá trình tải xuống, khiến nó trở nên lý tưởng để kéo tệp từ internet hoặc máy chủ từ xa.

    Đây là lệnh:

    Mã nguồn [Chọn]
    Start-BitsTransfer -Source "https://example.com/file.zip" -Destination "C:PathToSavefile.zip"
    Phương pháp này đặc biệt hữu ích khi tải xuống thứ gì đó quan trọng, như bản cập nhật phần mềm lớn hoặc tệp phương tiện lớn. Nó cũng tuyệt vời nếu bạn đang tự động tải xuống và phải đảm bảo chúng được hoàn tất thành công, ngay cả khi kết nối không hoàn hảo.


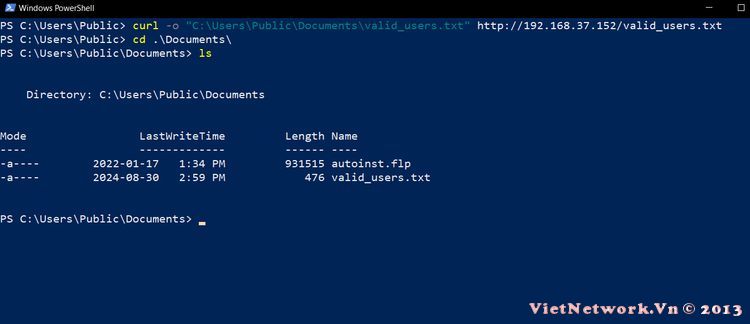
    3. Sử dụng curl trong PowerShell

    Đối với những người thích phương pháp dòng lệnh, curl là một công cụ quen thuộc cũng có trong PowerShell. Nó nhanh, hiệu quả và hoàn hảo để tải xuống tệp từ internet hoặc máy chủ mà không cần trình duyệt.

    Đây là lệnh:

    Mã nguồn [Chọn]
    curl -o "C:PathToSavefile.zip" https://example.com/file.zip
    • -o Là nơi bạn muốn lưu tập tin.

    Mặc dù PowerShell có lệnh curl tương đương là Invoke-WebRequest, nhưng việc sử dụng lệnh curl thực sự đôi khi cũng đơn giản và hiệu quả không kém.


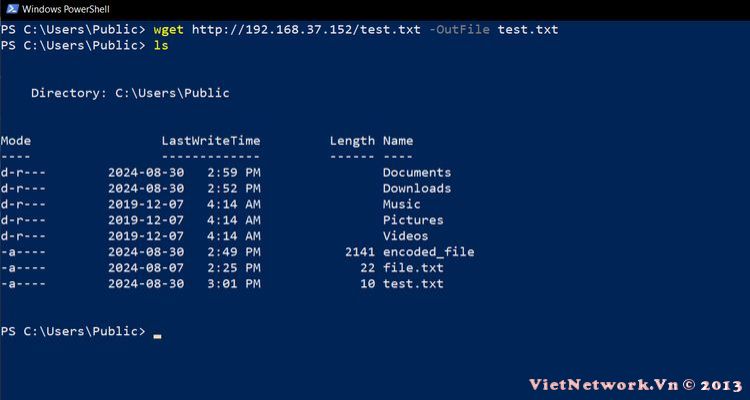
    4. Tải xuống đơn giản với wget

    Một công cụ dòng lệnh cổ điển khác là wget, bạn có thể sử dụng trong PowerShell. Nó nhẹ và đáng tin cậy, khiến nó trở thành lựa chọn tuyệt vời để tải xuống từ internet hoặc mạng gia đình.

    Sau đây là cách thức hoạt động:

    Mã nguồn [Chọn]
    wget https://example.com/file.zip -OutFile "C:PathToSavefile.zip"
    Wget lý tưởng cho những lúc bạn chỉ cần lấy một tập tin và tiếp tục công việc hằng ngày. Đây là công cụ hoàn hảo cho cả mục đích sử dụng thông thường và tự động hóa các tác vụ phức tạp hơn.


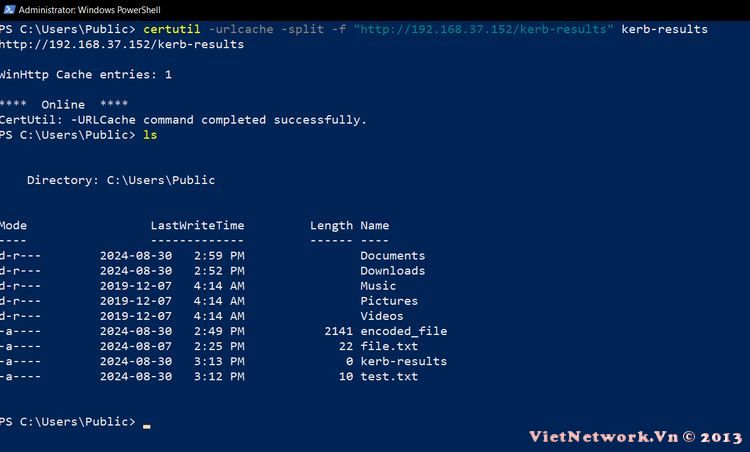
    5. Sử dụng certutil để tải xuống nhanh

    Nếu bạn đang sử dụng hệ thống không có nhiều công cụ và cần cách tải xuống tệp, certutil có thể giúp bạn. Mặc dù chủ yếu được sử dụng để quản lý chứng chỉ, nhưng nó có thể đóng vai trò như trình tải xuống tệp khi cần.

    Đây là lệnh:

    Mã nguồn [Chọn]
    certutil -urlcache -split -f "https://example.com/file.zip" "C:PathToSavefile.zip"
    • -urlcache yêu cầu certutil sử dụng tính năng bộ nhớ đệm URL, ban đầu được dùng để lưu trữ đệm các URL liên quan đến chứng chỉ. Trong ngữ cảnh này, nó sử dụng lại tính năng để tải xuống tệp từ URL đã chỉ định.
    • -split yêu cầu certutil chia quá trình tải xuống thành nhiều phần nhỏ hơn nếu cần thiết.
    • -f là viết tắt của "force" và đảm bảo rằng certutil sẽ ghi đè lên tệp đích mà không yêu cầu xác nhận.

    Certutil có thể không phải là công cụ đầu tiên bạn nghĩ đến, nhưng nó là một bản sao lưu hữu ích khi không có các tùy chọn khác. Đây là một lựa chọn tốt để ghi nhớ nếu bạn cần giải pháp tải xuống nhanh trên một hệ thống hạn chế.


    Vậy là bạn đã có năm cách dễ dàng để tải xuống tệp bằng PowerShell. Cho dù bạn đang vội và cần tải xuống nhanh hay đang giải quyết tình huống phức tạp hơn, một trong những phương pháp này sẽ phù hợp với bạn. Invoke-WebRequest và Start-BitsTransfer là những công cụ thiết yếu của bạn, nhưng luôn tốt khi có các công cụ như curl, wget và thậm chí là certutil sẵn sàng cho các tình huống khác nhau. Với các lệnh này trong bộ công cụ của bạn, việc tải xuống tệp trong PowerShell thật dễ dàng.         

    Chủ Nhật, 6 tháng 10, 2024

    NFS 2019

    Cài đặt server NFS share folder

    Last modified by Admin on 2024/05/06 17:17

    Mục tiêu

            Trong một số hệ thống lớn, một số server phải đảm nhiệm nhiều chức năng như chạy code, lưu trữ dữ liệu, lưu trữ media,… Điều này vô tình làm cho server chịu tải lớn, khó scale theo chiều ngang và khả năng mở rộng hệ thống bị hạn chế. Để khắc phục được một trong nhưng nhược điểm là lưu trữ dữ liệu, ta có thể sử dụng phương pháp tạo NFS server.

    NFS (Network File System) là một hệ thống giao thức chia sẻ file cho phép một người dùng trên một máy tính khách truy cập tới hệ thống file được chia sẻ trên máy chủ thông qua một mạng máy tính giống như truy cập trực tiếp trên ổ cứng.

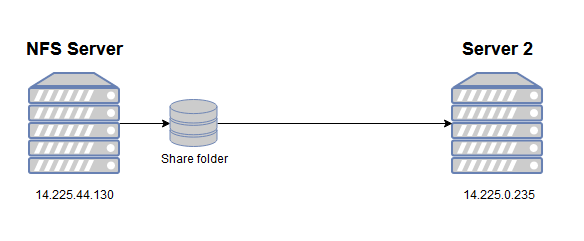
    Ở bài viết này mình sẽ dùng 2 server cấu hình như sau

    • Windows Server 2019
    • CPU: 4c
    • RAM: 4g
    • Ổ cứng: SSD 40GB

    image2022-8-22_9-45-15.png

    Ở đây ta sẽ setup 1 server làm server NFS, tạo 1 folder rồi share cho server 2 để lưu trữ

    Các bước cài đặt

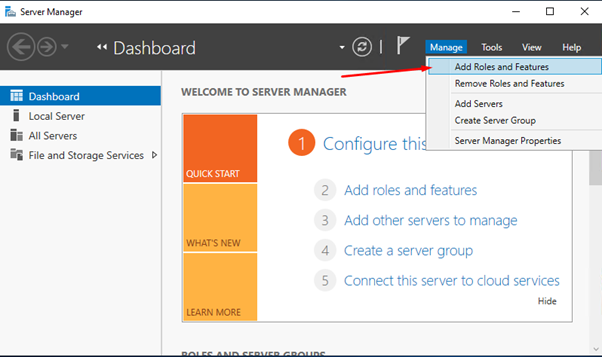
    Trên server NFS, vào cửa số Server Manager, chọn vào Manage -> Add Roles and Features

    image2022-8-22_9-46-49.png

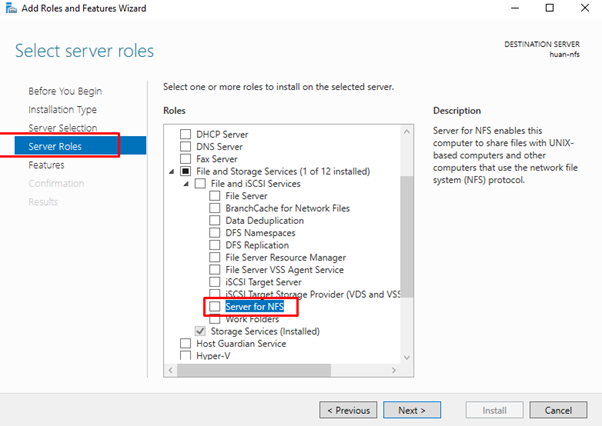
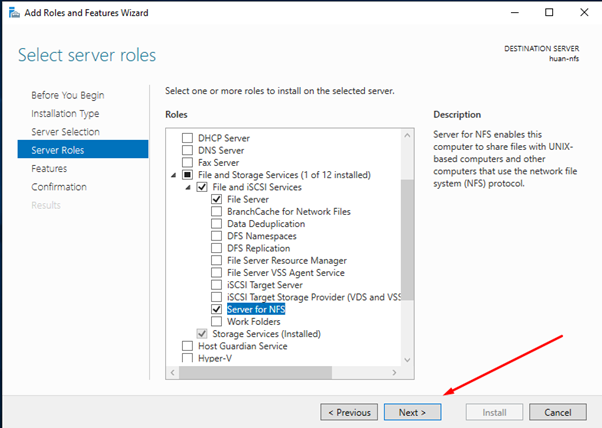
    Chuyển đến phần Server Roles, tìm đến mục Server for NFS như hình dưới rồi tích vào

    image2022-8-22_9-48-56.png

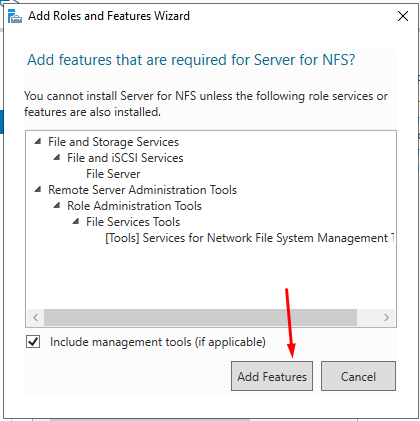
    Một pop-up xác nhận sẽ xuất hiện, chọn Add Features để xác nhận

    image2022-8-22_9-49-13.png

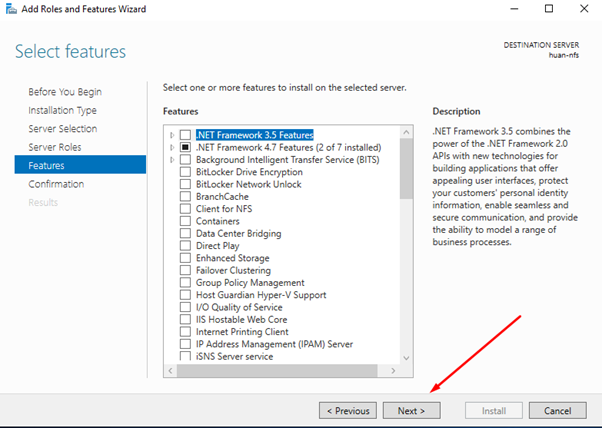
    Tiếp theo chọn Next để tiếp tục

    image2022-8-22_9-49-56.png

    Tiếp tục chọn Next để bỏ qua

    image2022-8-22_9-50-7.png

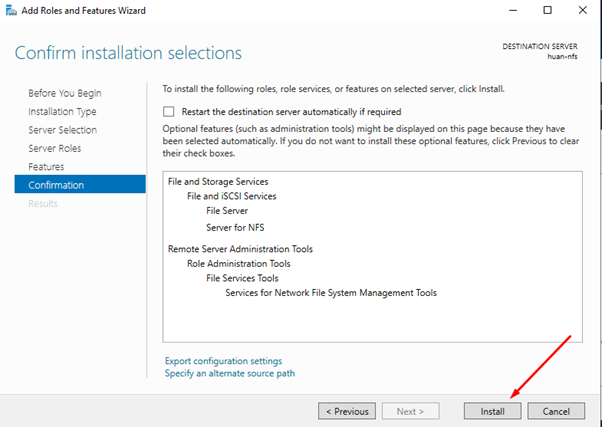
    Chọn vào Install để tiến hành cài đặt

    image2022-8-22_9-50-19.png

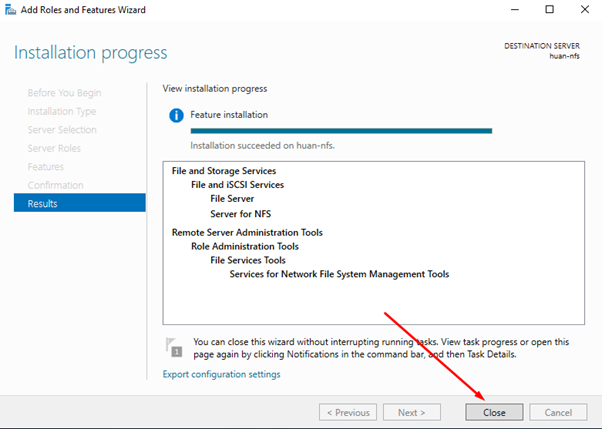
    Sau khi việc cài đặt được hoàn thành, chọn Close để thoát ra

    image2022-8-22_9-50-34.png

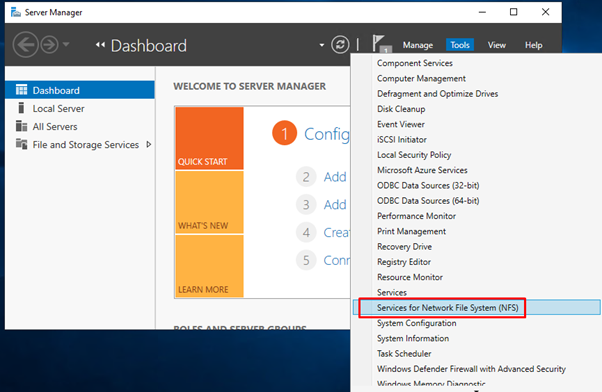
    Tiếp theo, ở của sổ Server Manager, ta tiến hành chọn vào Tools -> Server for NFS

    image2022-8-22_9-50-48.png

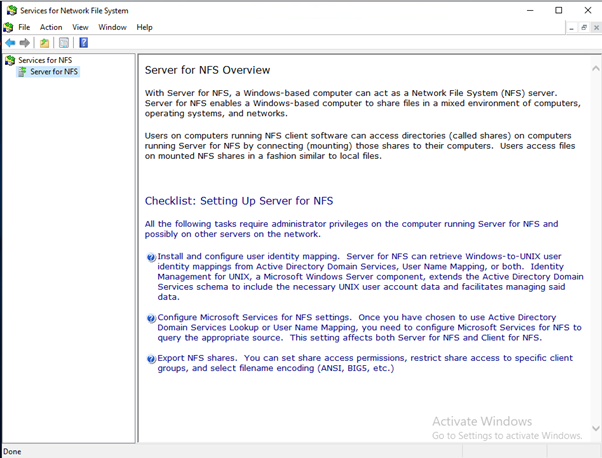
    Cửa sổ dịch vụ NFS sẽ xuất hiện. Như vậy là bạn đã cài đặt tính năng này thành công

    image2022-8-22_9-50-59.png

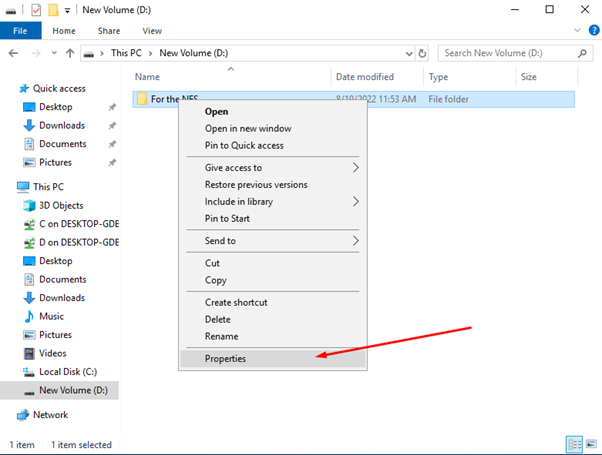
    Tiếp theo, ta sẽ setup 1 folder làm share forder cho server client. Đầu tiên, bạn cần tạo 1 folder. Sau đó chuột phải vào folder đó chọn Properties.

    image2022-8-22_9-51-17.png

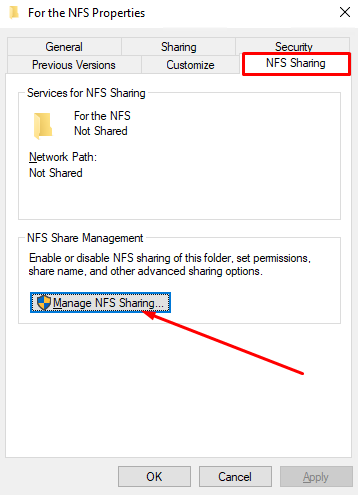
    Chọn vào tab NFS Sharing rồi bấm vào nút Manage NFS Sharing….

    image2022-8-22_9-51-27.png

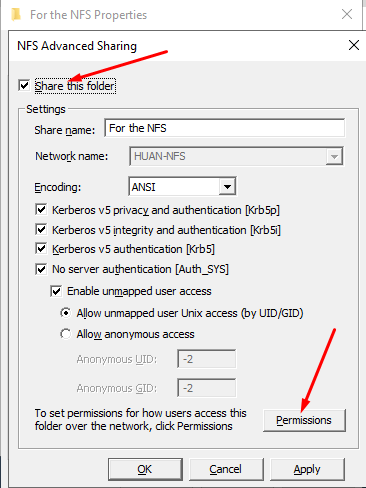
    Tích chọn vào Share this folder, sau đó chọn nút Permissions để cấp quyền.

    image2022-8-22_9-51-45.png

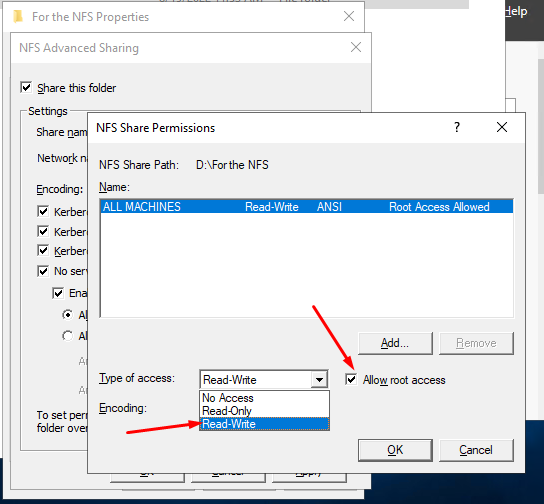
    Ở đây, ta sẽ tích chọn vào mục Allow root access, đổi kiểu truy cập thành Read-Write

    image2022-8-22_9-52-9.png

    Sau khi chọn xong, nhấn OKApply để xác nhận và thoát ra

    image2022-8-22_9-52-22.png

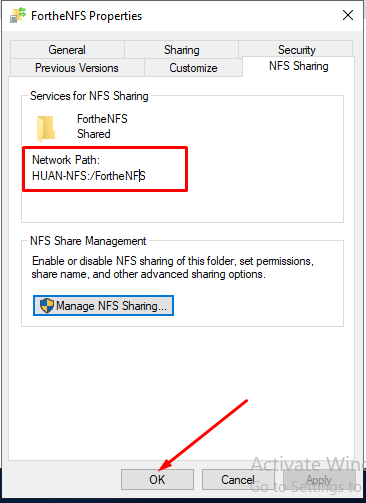
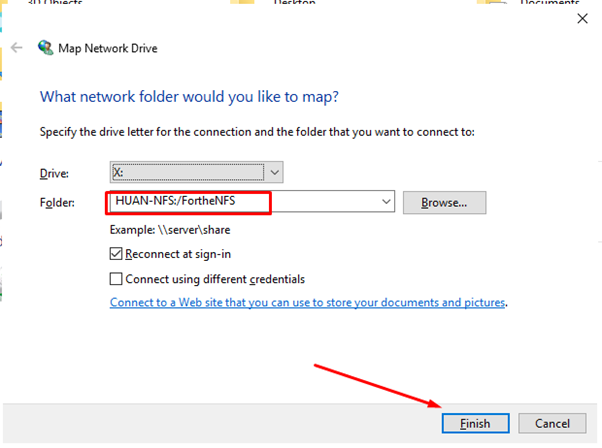
    Như vậy là ta đã setup xong server NFS. Ta sẽ cần lưu lại đường dẫn của folder NFS có dạng: HUAN-NFS:/FortheNFS

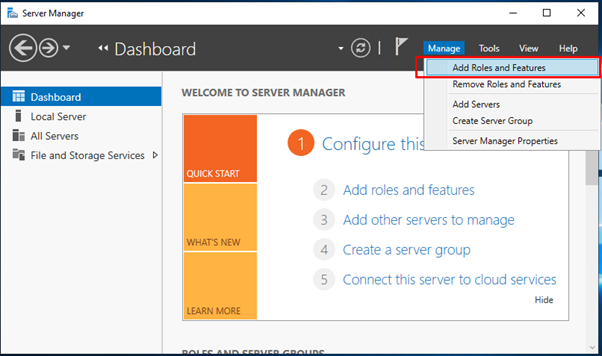
    Chuyển sang server client, ta vào cửa sổ của Server Manager, chọn vào Manage -> Add Roles and Features

    image2022-8-22_9-52-52.png

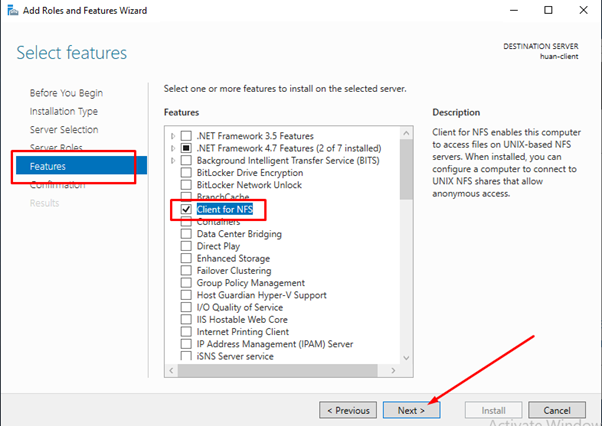
    Ta chọn Next, đến mục Features, tích chọn vào Client for NFS, sau đó chọn Next

    image2022-8-22_9-53-4.png

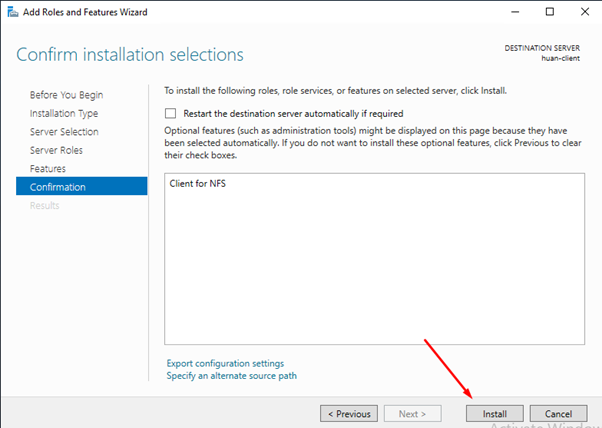
    Chọn vào Install để tiến hành cài đặt

    image2022-8-22_9-57-47.png

    Như vậy ta đã cài đặt xong.

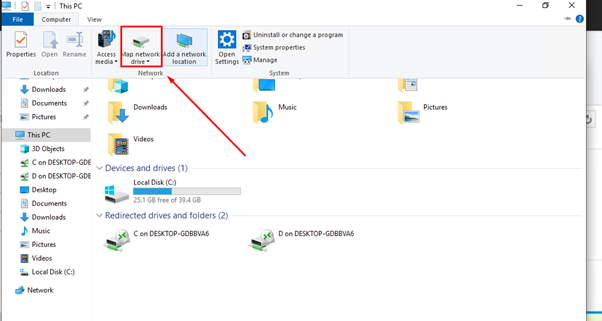
    Mở File Explorer lên, ta chọn vào tab Computer -> Map networ drive

    image2022-8-22_9-57-59.png

    Một pop-up kết nối sẽ hiển thị, ta sẽ paste thông tin của folder path vừa tạo vào ô Folder sau đó nhấn Finish

    image2022-8-22_9-58-8.png

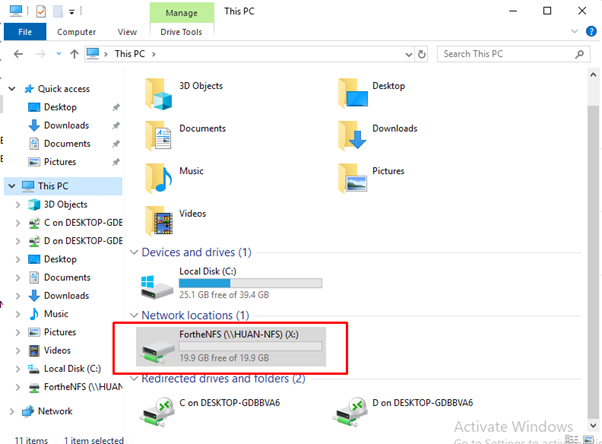
    Như vậy là bạn đã kết nối thành côn, 1 thư mục NFS sẽ xuất hiện, bạn có thể truy cập vào đó để đọc ghi dữ liệu.

    image2022-8-22_9-58-19.png

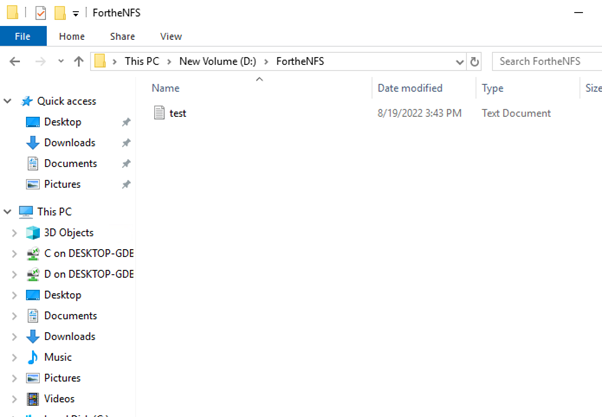
    Ví dụ, bạn thử tạo 1 file test trên server NFS.

    image2022-8-22_9-58-29.png

    Sang server client, bạn cũng sẽ thấy file test đó xuất hiện.

    image2022-8-22_9-58-50.png